
Mazda 3 Service Manual: Air Intake Actuator Inspection [Manual Air Conditioner]
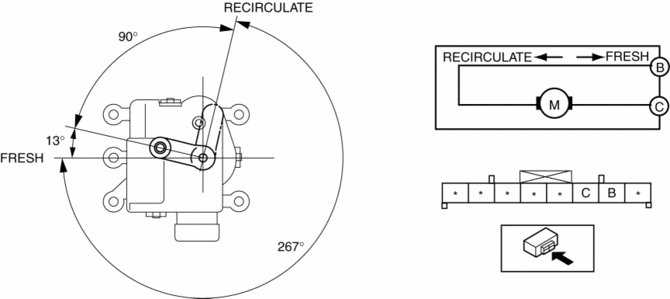
1. Connect battery positive voltage to air intake actuator terminal B (or C), connect terminal C (or B) to ground, and then verify that the air intake actuator operates as shown in the table.
-
If the operation condition is not normal, replace the air intake actuator.
|
Terminal |
Air intake actuator operation |
|
|
B |
C |
|
|
B+ |
Ground |
FRESH → RECIRCULATE |
|
Ground |
B+ |
RECIRCULATE → FRESH |
 Air Intake Actuator Inspection [Full Auto Air Conditioner]
1. Connect battery positive voltage to air intake actuator terminal B (or C),
connect terminal C (or B) to ground, and then verify that the air intake actuator
operates as shown in the table.
...
 Air Intake Actuator Removal/Installation [Full Auto Air Conditioner]
1. Set the air intake mode to FRESH.
2. Disconnect the negative battery cable..
3. Remove the following parts:
a. Front scuff plate (Passenger-side).
b. Front side trim (Passenger-side).
c. ...
Other materials:
Steering Gear And Linkage Inspection
Steering Rack Inspection
1. Inspect for cracking, damage, and tooth wear.
If there is any malfunction, replace the steering rack.
2. Measure the steering rack warp.
If it exceeds the maximum specification, replace the steering rack.
Steering rack runout
Large ...
Fuel Filler Lid Opener Bezel Removal/Installation
1. Remove the screw.
2. Pull the fuel-filler lid opener bezel in the direction of the arrow (1) then
remove the tab.
3. Move the fuel-filler lid opener bezel in the direction of the arrow (2) shown
in the figure.
4. Remove the fuel-filler lid opener bezel.
5. Install in the rever ...
Floor Mat
WARNING
Make sure the fl oor mats are hooked on
the retention pins to prevent them from
bunching up under the foot pedals:
Using a fl oor mat that is not secured is
dangerous as it will interfere with the
accelerator and brake pedal operation,
which could result in an acc ...
