Mazda 3 Service Manual: Brake Pedal Inspection
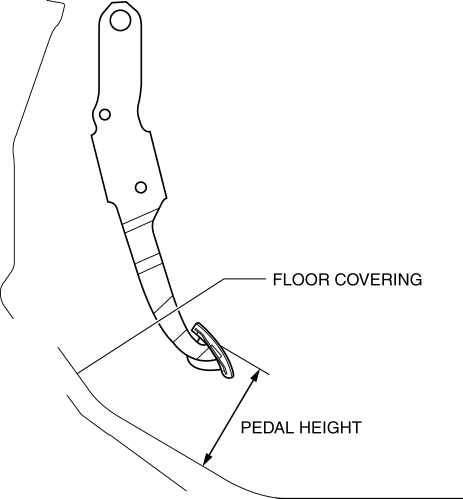
Pedal Height Inspection
1. Measure the distance from the center of the upper surface of the pedal pad to the floor covering and verify that it is as specified.

-
If not within the specification, replace the brake pedal.
-
Brake pedal height (reference value)
-
MZR 2.0, SKYACTIV-G 2.0, MZR 2.5: 125.0 mm {4.921 in}
-
MZR 2.3 DISI Turbo: 128.9 mm {5.075 in}
Pedal Play Inspection
1. Pump the pedal several times to release the vacuum in the power brake unit.
2. Gently depress the pedal by hand and measure the pedal play.
-
If not within the specification, inspect the wear of the joint pin. Replace it if there is any malfunction.
-
Brake pedal play
-
4.0—8.4 mm {0.16—0.33 in}
NOTE:
-
If there is no malfunction in the joint pin, there is a possibility that the power brake unit has some malfunction. Verify that there are no malfunctions, and replace it if necessary.
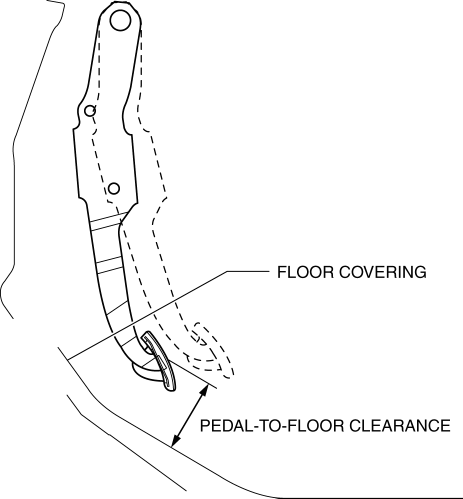
Pedal-to-floor Clearance Inspection
1. Start the engine and depress the brake pedal with a force of 147 N {15.0 kgf, 33.0 lbf}
.
2. Measure the distance from the center of the upper surface of the pedal pad to the floor covering and verify that it is as specified.

-
If it is less than the specification, inspect for air in the brake line.
-
Brake pedal-to-floor clearance (Brake pedal when depressed at 147 N {15.0
kgf, 33.0 lbf})
-
MZR 2.0, SKYACTIV-G 2.0, MZR 2.5: 83.5 mm {3.29 in} or more
-
MZR 2.3 DISI Turbo: 88.6 mm {3.49 in} or more
 Brake Hose (Rear) Removal/Installation [Mzr 2.5, Mzr 2.3 Disi Turbo]
1. Remove in the order indicated in the table.
2. Install in the reverse order of removal.
3. Add brake fluid, bleed the brakes, and inspect for leakage after the installation
has been completed ...
 Brake Pedal Removal/Installation
CAUTION:
The clearance between the brake switch and the brake pedal is automatically
adjusted to the correct amount when the brake switch is inserted into the installation
hole on the br ...
Other materials:
Operating the Compact Disc (CD) Player
NOTE
If a disc has both music data (CD-DA)
and MP3/WMA/AAC files, playback of the
two or three file types differs depending on
how the disc was recorded.
Inserting the CD
Insert the CD into the slot, label-side up.
The auto-loading mechanism will set the
CD and begin play.
NOTE
T ...
Personalization Features
The following personalization features can be set or changed by an Authorized
Mazda
Dealer. Consult an Authorized Mazda Dealer for details.
Additionally, some of the personalization features can be changed by the
customer
depending on the feature.
Personalization features which can be ch ...
Battery Recharging [Skyactiv G 2.0]
Using GR8-1291:
(See GR8-1291 INSTANT TRAINING MODULE (VIDEO) .)
WARNING:
Keep all flames away from the battery, otherwise evaporated gas from the
battery fluid may catch fire and cause serious injury.
1. Remove the battery filler caps and check the water level. If necessary, add ...
