Mazda 3 Service Manual: Antenna Feeder No.5 Removal/Installation
1. Disconnect the negative battery cable..
2. Remove the following parts:
a. Front scuff plate (RH).
b. Front side trim (RH).
c. Rear scuff plate (RH).
d. B-pillar lower trim (RH).
e. Rear seat cushion.
f. Tire house trim (RH).
3. Partially peel back the floor covering.
4. Disconnect the antenna feeder No.4.
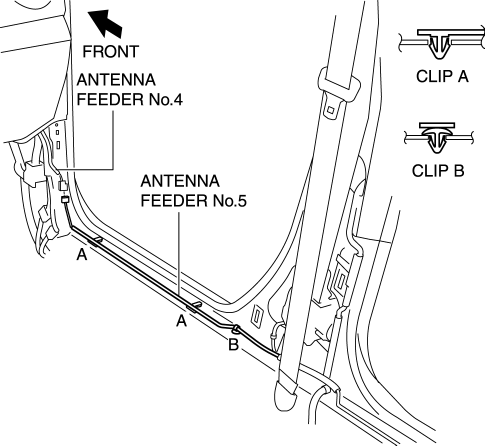
5. Remove the clips A and B.
6. Disconnect the antenna feeder No.3.
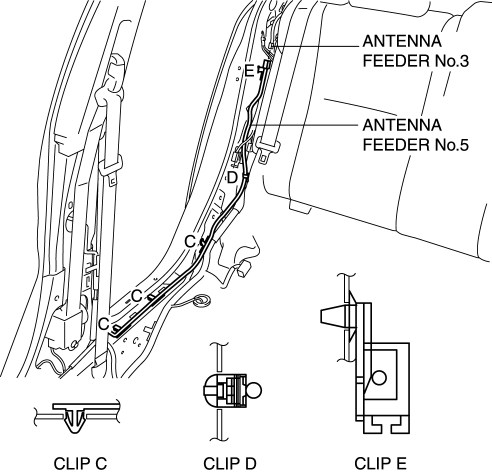
7. Remove the clips C, D and E.
8. Remove the antenna feeder No.5.
9. Install in the reverse order of removal.
 Antenna Feeder No.5 Inspection
1. Disconnect the negative battery cable..
2. Remove the following parts:
a. Front scuff plate (RH).
b. Front side trim (RH).
c. Rear seat cushion.
d. Rear scuff plate (RH).
e. Tire house ...
 Antenna Feeder No.6 Inspection
1. Disconnect the negative battery cable..
2. Remove the following parts:
a. Upper panel.
b. Shift knob (MTX).
c. Selector lever knob (ATX).
d. Shift panel.
e. Side wall.
f. Console.
g ...
Other materials:
Tire information
Typical tire symbols
Location of treadwear indicators
Maximum load rating at the specified cold tire pressure for the Subaru Solterra
Maximum cold tire inflation pressure
This value indicates the highest pressure level permitted for safe tire inflation.
Tire size designation used ...
For safe driving
For optimal safety in your Subaru Solterra, always adjust your seating
position, mirrors, and driving posture correctly before starting your journey.
Correct driving posture
Adjust the seatback angle so that you sit upright comfortably without needing
to lean forward while steering y ...
Theft Deterrent System Clearing Freeze Frame Data
1. Connect the M-MDS (IDS) to the DLC–2.
2. After the vehicle is identified, select the following items from the initialization
screen of the IDS.
Select “Body”.
Select "Burglar Service Functions".
3. Then, select the following item from the screen menu. ...
