Mazda 3 Service Manual: Auxiliary Jack/Usb Port Inspection
Auxiliary jack inspection
1. Disconnect the negative battery cable..
2. Remove the following parts:
a. Upper panel.
b. Shift lever knob (MTX).
c. Selector lever knob (ATX).
d. Shift panel.
e. Side wall.
f. Console.
g. Auxiliary jack/USB port.
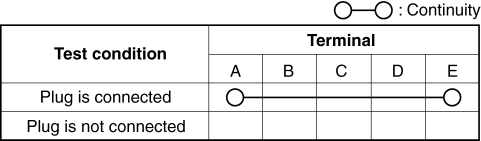
3. Connect a commercially-available plug to the auxiliary jack/USB port.
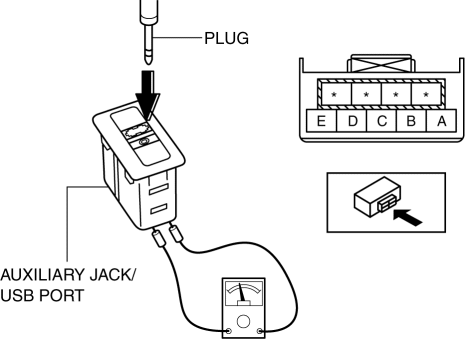
4. Verify that the continuity between the auxiliary jack/USB port terminals is as indicated in the table.
-
If not as indicated in the table, replace the auxiliary jack/USB port.
USB port inspection
1. Disconnect the negative battery cable..
2. Remove the following parts:
a. Upper panel.
b. Shift lever knob (MTX).
c. Selector lever knob (ATX).
d. Shift panel.
e. Side wall.
f. Console.
g. Auxiliary jack/USB port.
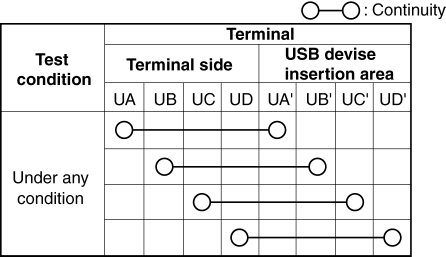
3. Insert the pins to positions UA', UB', UC', and UD' shown in the figure from the side of the USB device insertion area for the auxiliary jack/USB port, and verify the continuity at the insertion side and terminal side of the USB device.
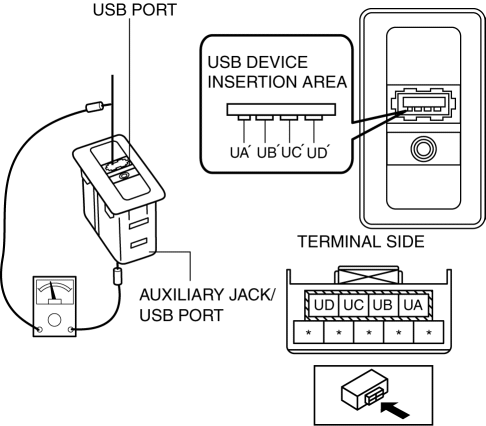
4. Verify that the continuity at the insertion side and terminal side of the USB device is as indicated in the table.
NOTE:
-
When inspecting the USB device insertion side, touch it with a paper clip or similar thin pin without directly inserting a tester into the terminals.
-
If not as indicated in the table, replace the auxiliary jack/USB port.
 Auxiliary Jack/Usb Port
NOTE:
“iPod” is a registered trademark of Apple Inc. in the United States and other
countries.
Purpose, Function
The Auxiliary jack/USB port outputs the audio signals of co ...
 Auxiliary Jack/Usb Port Removal/Installation
1. Disconnect the negative battery cable..
2. Remove the following parts:
a. Upper panel.
b. Shift lever knob (MTX).
c. Selector lever knob (ATX).
d. Shift panel.
e. Side wall.
f. Consol ...
Other materials:
Hood Removal/Installation
WARNING:
Removing the hood without supporting it could cause the hood to fall and
cause serious injury. Always perform the procedure with at least another person
to prevent the hood from falling.
1. Disconnect the negative battery cable..
2. Remove the following parts:
a. Fro ...
Magnetic Clutch Disassembly/Assembly [Manual Air Conditioner]
1. Disassemble in the order indicated in the table.
SKYACTIV-G 2.0
1
Bolt
(See Bolt Removal/Installation Note.)
2
Pressure plate
3
Shim
(See Shim Installation Note.)
4
Snap ring
...
Starter Interlock Switch Inspection [Mzr 2.0, Mzr 2.5]
CAUTION:
Do not reuse the starter interlock switch if it is removed from the vehicle
even once. Replace with a new starter interlock switch when installing.
1. Remove the battery cover..
2. Disconnect the negative battery cable..
3. Disconnect the starter interlock switch connec ...
