Mazda 3 Service Manual: Back Up Light Switch Removal/Installation [G66 M R]
1. Remove the battery cover..
2. Disconnect the negative battery cable.
3. Remove the battery component. (ex: battery, battery tray and PCM component).
4. Remove the aerodynamic under cover No.2..
5. Drain the oil from the transaxle..
6. Disconnect the back-up light switch connector and remove the back-up light switch.
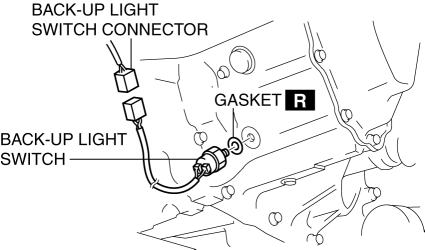
7. Install the back-up light switch (with a new gasket) to the transaxle case.
-
Tightening torque
-
20—29 N·m {2.1—2.9 kgf·m, 15—21 ft·lbf}
8. Install the battery component. (ex: battery, battery tray and PCM component).
9. Install the battery cover..
10. Add the specified amount and type of oil..
11. Install the aerodynamic under cover No.2..
 Back Up Light Switch Removal/Installation [G35 M R]
1. Remove the battery cover..
2. Disconnect the negative battery cable.
3. Remove the battery component. (ex: battery, battery tray and PCM component).
4. Remove the aerodynamic under cover No. ...
 Combination Switch Disassembly/Assembly
CAUTION:
Handling the air bag module improperly can accidentally deploy the air bag
module, which may seriously injure you. Read the air bag system service warnings
and cautions before h ...
Other materials:
Front Seat Belt Removal/Installation [Two Step Deployment Control System]
WARNING:
Handling the front seat belt (pre-tensioner seat belt) improperly can accidentally
deploy the pre-tensioner seat belt, which may seriously injure you. Read the
air bag system service warnings and cautions before handling the front seat
belt..
WARNING:
The side ...
My Settings
In the Subaru Solterra, the My Settings function enables personalized
driver recognition using various authentication devices, automatically restoring
individual driving preferences and vehicle configurations upon entry.
By linking a specific device—such as an electronic key—to a registered ...
Rear Center Speaker Removal/Installation
1. Disconnect the negative battery cable..
2. Remove the following parts:
a. Rear seat cushion.
b. Rear scuff plate.
c. Tire house trim.
d. C-pillar trim.
e. Rear package trim.
3. Remove the screw.
4. Disconnect the connector.
5. Remove the rear center speaker.
6. Install in ...
