Mazda 3 Service Manual: Clutch Pipe And Hose Removal/Installation [C66 M R]
CAUTION:
-
Do not allow clutch fluid get on a painted surface. Clutch fluid contains properties which can dissolve the paint. If clutch fluid gets on a painted surface, wash it off with water immediately and wipe the area off completely.
1. Remove the battery cover..
2. Disconnect the negative battery cable..
3. Remove the battery component. (ex: battery, battery tray and PCM component).
4. Remove the air cleaner component. (ex: air cleaner, air hose).
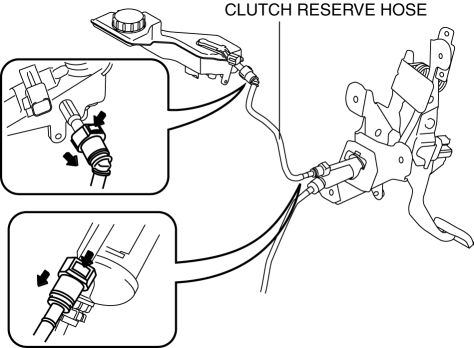
5. Remove the clutch reserve hose while pressing the point indicated by the arrow in the figure.

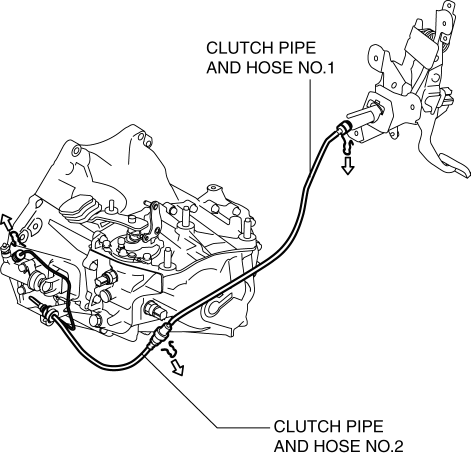
6. Remove the clutch pipe and hose (No.1 and No.2)clutch pipe and hose (No.1 and No.2).

a. Lift the connector clip.
b. Pull out the clutch pipe and hose (No.1 and No.2) connector straight to detach it.
c. Remove the clutch pipe and hose (No.1 and No.2).
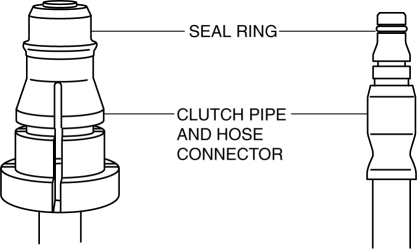
7. Verify that the seal ring is installed to the clutch pipe and hose connector.

CAUTION:
-
When removing the clutch pipe and hose, the seal ring for the clutch pipe and hose could remain on the receiving area of the connector. If the clutch pipe and hose is assembled under this condition, it could cause clutch fluid leakage from the connector.
8. Install the clutch pipe and hose (No.1 and No.2).
a. Press in the connector clip.
b. Insert the clutch pipe and hose (No.1 and No.2) connector straight.
NOTE:
-
When the connector is engaged, a click sound is heard.
c. Install the clutch pipe and hose (No.1 and No.2).
9. Insert the clutch reserve hose connector straight.
NOTE:
-
When the connector is engaged, a click sound is heard.
10. Pull each engagement of the clutch reserve hose and clutch pipe and hose No.1 and 2, verify that they are engaged, and then press all of them again.
11. Install in the reverse order of removal.
12. Bleed the air from the clutch system..
 Clutch Pedal Removal/Installation [C66 M R]
CAUTION:
Secure the steering wheel using tape or a cable to prevent the steering shaft
from rotating after disconnecting the steering shaft. If the steering wheel
rotates after the steer ...
 Clutch Release Collar Inspection [C66 M R]
CAUTION:
Do not clean the clutch release collar with cleaning fluids or a steam cleaner
because it is filled with grease.
Operation Inspection
1. Turn the collar while applying force ...
Other materials:
Starter Removal/Installation [Mzr 2.0, Mzr 2.5]
WARNING:
Remove and install all parts when the engine is cold, otherwise they can
cause severe burns or serious injury.
When the battery cables are connected, touching the vehicle body with starter
terminal B will generate sparks. This can cause personal injury, fire, and d ...
Variable Tumble Shutter Valve Switch Inspection [Mzr 2.0, Mzr 2.5]
Voltage Inspection
NOTE:
The variable tumble shutter valve switch cannot be removed as a single unit.
When replacing the variable tumble shutter valve switch, replace it together
with the intake manifold as a single unit.
1. Connect the M-MDS to the DLC–2.
2. Switch the ig ...
Seat Belt Inspection
Belt
1. Verify that the belt is installed properly with no twists or kinks.
2. Verify that there is no damage to the seat belt and no deformation of the
metal fittings.
If there is any malfunction, replace the seat belt.
ELR
Except 5HB (rear center seat belt)
1. Verify tha ...
