Mazda 3 Service Manual: Door Adjustment
1. Loosen the door hinge installation bolts.
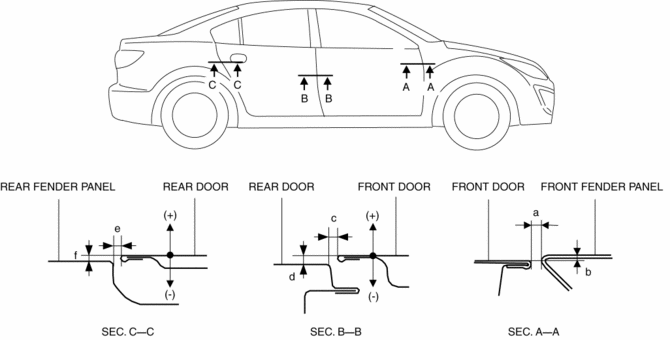
2. Adjust the gap and height difference to the standard range by moving the door back and forth, left and right.
-
Standard range
-
a: 2.5―4.5 mm {0.10―0.17 in}
-
b: -1.0―1.0 mm {-0.039―0.039 in}
-
c: 2.5―4.5 mm {0.10―0.17 in}
-
d: -1.0―1.0 mm {-0.039―0.039 in}
-
e: 2.5―4.5 mm {0.10―0.17 in}
-
f: -1.0―1.0 mm {-0.039―0.039 in}
3. Tighten the bolts.
4. If the door does not open/close smoothly, adjust it by loosening the door lock striker installation screw.

 Door Sash Film Installation
1. Remove any grease or dirt from the affixing surface of the door.
2. Cut away the unused portion along the dotted lines.
3. Peel off the backing paper and attach the door sash film onto the ...
Other materials:
Power Brake Unit Inspection
NOTE:
The following inspection methods are simple inspection methods to judge the
function of the power brake unit.
If there is any malfunction in the power brake unit, replace the power brake
unit as a single unit.
Without Using SST
Operation inspection
1. With the eng ...
Utility vehicle precautions
The Subaru Solterra belongs to the utility vehicle category, engineered
with increased ground clearance and a comparatively narrower track width relative
to its center of gravity height. This design allows the Subaru Solterra to perform
effectively across a wide range of off-road environments ...
If the EV system will not start
If your Subaru Solterra does not power on as expected, the underlying
cause can vary depending on environmental conditions, system status, or component
functionality. Carefully review the following scenarios and apply the appropriate
solution to restore operation safely and efficiently.
The E ...
