Mazda 3 Service Manual: Door Sash Film Installation
1. Remove any grease or dirt from the affixing surface of the door.
2. Cut away the unused portion along the dotted lines.
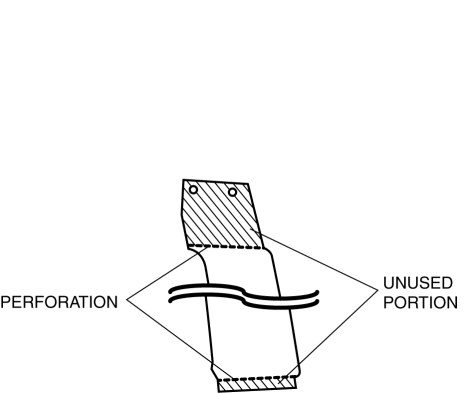
3. Peel off the backing paper and attach the door sash film onto the door as shown in the figure.
-
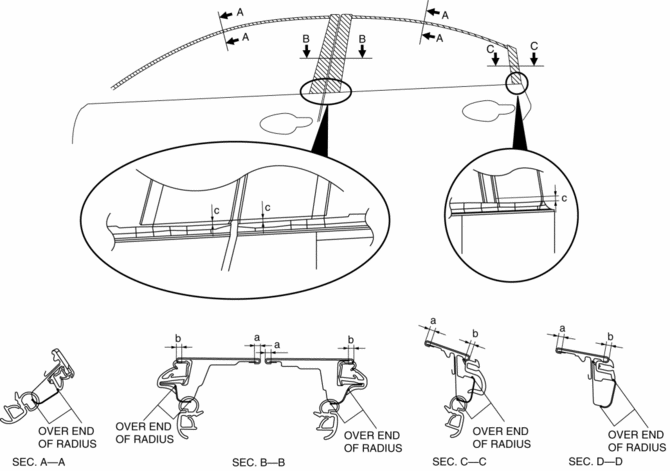
Standard clearance
-
a: 3.0—5.0 mm {0.12—0.19 in}
-
b: 3.0 mm or more {0.12 in or more}
-
c: 4.0—6.0 mm {0.16—0.23 in}
4. Peel off the transparent protective film on the door sash film.
5. Install the following parts:
a. Rear beltline molding.
b. Front beltline molding.
c. Rear door quarter glass.
d. Rear door speaker.
e. Rear door trim.
f. Power outer mirror.
g. Front door trim.
h. Inner garnish.
6. Connect the negative battery cable..
 Door Adjustment
1. Loosen the door hinge installation bolts.
2. Adjust the gap and height difference to the standard range by moving the door
back and forth, left and right.
Standard range
a: 2.5 ...
 Door Sash Film Removal
1. Disconnect the negative battery cable.
2. Partially peel back the glass run channel.
3. Partially peel back the door weatherstrip.
4. Remove the following parts:
a. Inner garnish.
b. Fron ...
Other materials:
Power Window System Preliminary Inspection [Power Window System]
Manual Open/close Function Inspection
STEP
INSPECTION
ACTION
1
Switch the ignition to ON.
Operate the power window using the manual open/close function on
the power window main switch.
...
Indicator Lights
These lights turn on or flash to notify the user of the system operation
status or a system
malfunction.
Signal
Indicator Lights
* BSM OFF Indicator Light
* Lane Departure Warning System (LDWS) Indicator Light
KEY Indicator Light
...
Camshaft Position (CMP) Sensor Inspection [Mzr 2.0, Mzr 2.5]
Visual Inspection
CAUTION:
When replacing the CMP sensor, make sure there is no foreign material on
it such as metal shavings. If it is installed with foreign material, the sensor
output signal will malfunction resulting from fluctuation in magnetic flux and
cause a deterioration i ...
