Mazda 3 Service Manual: Inner Garnish Removal/Installation
1. Disconnect the negative battery cable..
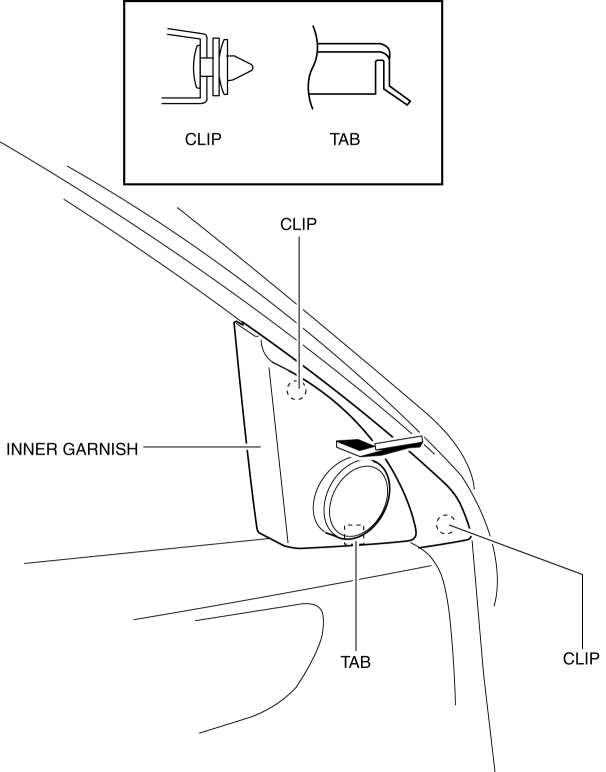
2. Pull the inner garnish in the direction of the arrow shown in the figure and remove it while detaching clips and tab.
CAUTION:
-
When pulling out the inner garnish, be careful not to damage the tab.
3. Disconnect the front tweeter connector. (Vehicles with tweeter)
4. Install in the reverse order of removal.
 Hole Cover Removal/Installation
With Car-navigation system
1. Disconnect the negative battery cable..
2. Remove the following parts:
a. Upper column cover.
b. Instrument cluster.
c. Center panel.
d. Center cover.
e. Das ...
 Lower Panel Removal/Installation
Driver-side
1. Disconnect the negative battery cable..
2. Remove the following parts:
a. Driver-side front scuff plate.
b. Driver-side front side trim.
c. Hood release lever.
d. Upper panel ...
Other materials:
Control Switches
Temperature control dial
This dial controls temperature. Turn it
clockwise for hot and counterclockwise
for cold.
NOTE
When the mode is set to or
with the
fan control dial in a position other than 0
and the temperature control dial in the
maximum cold position, the air intake
selector ...
Joint Shaft Assembly [Skyactiv G 2.0]
1. Assemble in the order indicated in the table.
1
Dust cover
.
2
Bearing
.
3
Snap ring
4
Dust seal
.
5
Joint shaft
Dust Cover Assembly N ...
Accelerator Pedal Removal/Installation [Mzr 2.0, Mzr 2.5]
1. Remove the battery cover..
2. Disconnect the negative battery cable..
3. Remove the driver-side lower panel..
4. Remove in the order indicated in the table.
1
APP sensor connector
2
Accelerator pedal
5. Install in the rev ...
