Mazda 3 Service Manual: Drive Belt Auto Tensioner Inspection [Skyactiv G 2.0]
WARNING:
-
A hot engine can cause severe burns. Turn off the engine and wait until it is cool before servicing.
CAUTION:
-
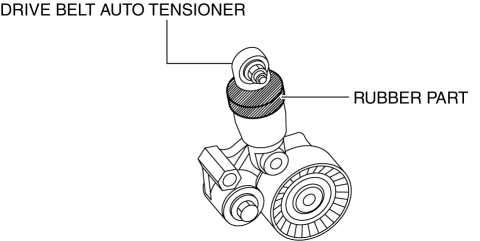
If the rubber part of the drive belt auto tensioner is damaged by a screwdriver or other tool, oil in the hydraulic pressure unit could leak and the tensioner may not operate normally. Be careful not to damage the rubber part of the drive belt auto tensioner.
1. Remove the generator drive belt..
CAUTION:
-
To prevent damage to the drive belt auto tensioner, do not apply excessive torque after the tensioner moves full-stroke.
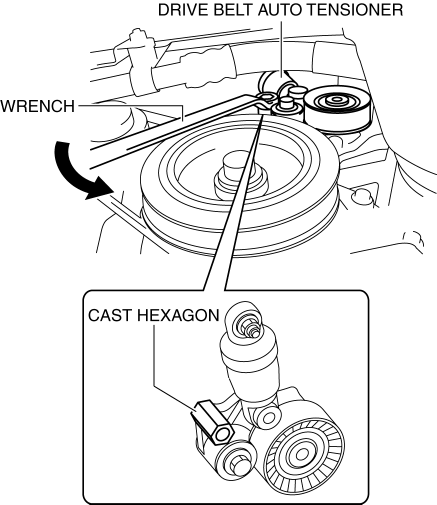
2. Insert the wrench into the cast hexagon on the drive belt auto tensioner, slowly turn it in the direction of the arrow shown in the figure, and fully depress.
NOTE:
-
The drive belt auto tensioner is operated in the direction of the arrow by turning the wrench.
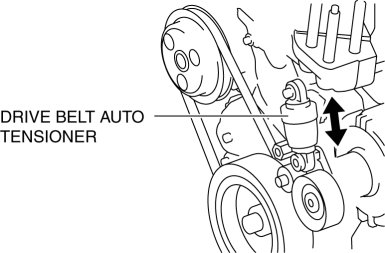
3. Verify that the drive belt auto tensioner moves smoothly in the operational direction.
-
If it does not move smoothly, replace the drive belt auto tensioner..
4. Turn the drive belt auto tensioner pulley by hand and verify that it rotates smoothly.

-
If it does not move smoothly, replace the drive belt auto tensioner..
5. Install the generator drive belt..
 Drive Belt Auto Tensioner Inspection [Mzr 2.3 Disi Turbo]
1. Remove the aerodynamic under cover No.2 and splash shield as a single unit..
2. Remove the drive belt..
3. Verify that the drive belt auto tensioner moves smoothly in the operational
directi ...
 Drive Belt Inspection [Mzr 2.0, Mzr 2.5]
MZR 2.0
A/C drive belt
NOTE:
Drive belt deflection/tension inspection is not necessary because of the
use of the maintenance-free type A/C drive belt.
Replace the drive belt i ...
Other materials:
Brake Fluid Pressure Sensor Inspection
1. Switch the ignition to off.
2. Install the SSTs to the master cylinder (secondary side) as shown in
the figure.
NOTE:
When installing the SST (49 D043 0A0) to the master cylinder, use
a commercially available flare nut wrench (flare nut across flat 12 mm {0.47
in}).
...
B Pillar Upper Trim Removal/Installation
1. Remove the following parts:
a. Adjuster anchor cover.
b. Upper anchor installation bolts on the front seat belt.
c. Front scuff plate.
d. Rear scuff plate.
2. Partially peel back the seaming welt.
3. Remove the B-pillar lower trim..
4. Grasp the lower end of the B-pillar upper trim, ...
Trunk Side Trim Removal/Installation
4SD
Left-side
1. Remove the following parts:
a. Rear scuff plate.
b. Tire house trim.
c. Trunk mat.
d. Trunk board.
e. Trunk end trim.
f. Service hole cover
2. Remove the fasteners.
3. Install in the reverse order of removal.
Right-side
1. Remove the following parts:
a. Re ...
