Mazda 3 Service Manual: Brake Fluid Pressure Sensor Inspection
1. Switch the ignition to off.
2. Install the SSTs
to the master cylinder (secondary side) as shown in the figure.

NOTE:
-
When installing the SST
(49 D043 0A0) to the master cylinder, use a commercially available flare nut wrench (flare nut across flat 12 mm {0.47 in}
).
3. Bleed the brake line and the SSTs
of air. (Bleed the SSTs
of air using air bleed valve A.)
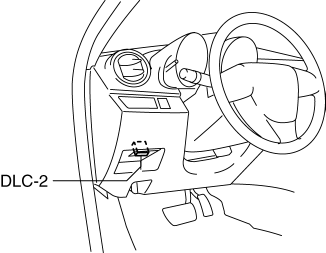
4. Connect the M-MDS to the DLC-2.
5. Select the “MCYLI_P” PID..
6. Start the engine.
7. Depress the brake pedal, and verify that the fluid pressure value of the SST
(gauge) and the value shown on the M-MDS are equal.
-
If the fluid pressure values are different, replace the DSC HU/CM..
 Brake Fluid Inspection
1. Verify that the brake fluid level in the reserve tank is between the MAX and
MIN marks.
If the brake fluid level is below the MIN mark, add brake fluid.
...
 Brake Hose (Front) Removal/Installation [Mzr 2.0, Skyactiv G 2.0, Mzr 2.5]
1. Remove in the order indicated in the table.
2. Install in the reverse order of removal.
3. Add brake fluid, bleed the brakes, and inspect for leakage after the installation
has been completed ...
Other materials:
Locking, Unlocking with Door-
Lock Knob
Operation from inside
To lock any door from the inside, press the
door-lock knob.
To unlock, pull it outward.
This does not operate the other door locks.
NOTE
The red indication can be seen when the
door-lock knob is unlocked.
Operation from outside
To lock the rear and front pa ...
Radar Sensor (Front)
Your vehicle is equipped with a radar sensor (front).
The following systems also use the radar sensor (front).
Mazda Radar Cruise Control (MRCC)
Forward Obstruction Warning (FOW)
The radar sensor (front) functions by detecting the radio waves reflected off
a vehicle ahead
or an obstru ...
Inspecting Engine Oil Level
Be sure the vehicle is on a level
surface.
Warm up the engine to normal
operating temperature.
Turn it off and wait at least 5 minutes
for the oil to return to the oil pan.
Pull out the dipstick, wipe it clean, and
reinsert it fully.
Pull it out again and examine the level ...
