Mazda 3 Service Manual: DSC HU/CM Removal/Installation
WARNING:
-
If the DSC HU/CM configuration is not completed, it could result in an unexpected accident due to the DSC being inoperative. If the DSC HU/CM is replaced, always use the automatic configuration function so that the DSC operation conditions are correct.
-
If the DSC sensor initialization procedure is not completed, the DSC will not operate properly and it might cause an unexpected accident. Therefore, after replacing or removing the DSC HU/CM or SAS control module, make sure to perform the DSC sensor initialization procedure to insure proper DSC operation.
CAUTION:
-
The internal parts of the DSC HU/CM could be damaged if dropped. Be careful not to drop the DSC HU/CM. Replace the DSC HU/CM if it is subjected to an impact.
NOTE:
-
When the ignition is switched to ON or the engine is started after the DSC HU/CM have been replaced, the DSC CM reads data from the instrument cluster via CAN communication to perform automatic configuration.
1. Remove the battery and battery tray..
2. Remove in the order indicated in the table.
3. Install in the reverse order of removal.
4. Switch the ignition to ON or start the engine, and maintain this condition for approx. 30 s
to allow the DSC HU/CM automatic configuration to be performed.
5. Perform the DSC sensor initialization procedures..
6. Clear the DTCs from the memory..
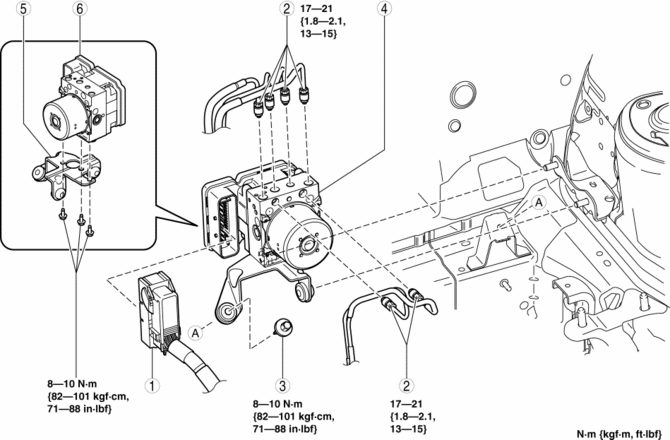
|
1 |
Connector (See ABS HU/CM REMOVAL/INSTALLATION.) |
|
2 |
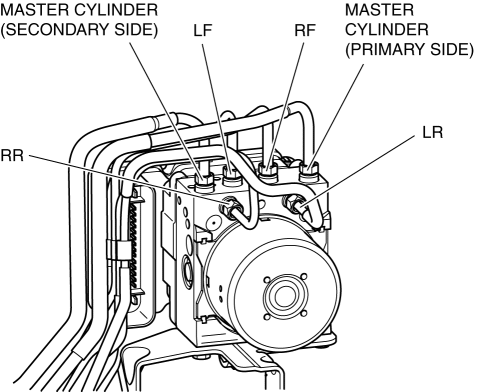
Brake pipe (See Brake Pipe Removal Note.) (See Brake Pipe Installation Note.) |
|
3 |
Bolt |
|
4 |
DSC HU/CM, bracket (See DSC HU/CM, Bracket Removal Note.) |
|
5 |
Bracket |
|
6 |
DSC HU/CM |
Brake Pipe Removal Note
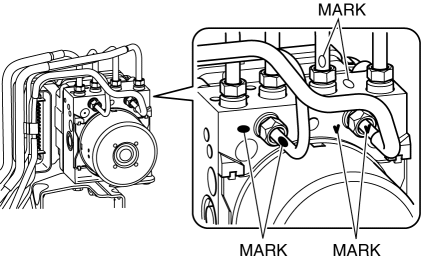
1. Place an alignment mark on the brake pipe and DSC HU/CM.
2. Apply protective tape to the connector to prevent brake fluid from entering.
3. Remove the brake pipe.
DSC HU/CM, Bracket Removal Note
1. As shown in the figure, move the bracket in the direction of the arrow and remove the DSC HU/CM and bracket from the body.

Brake Pipe Installation Note
1. Align the marks made before removal and install the brake pipe into the DSC HU/CM referring to the figure.
 DSC HU/CM Inspection
1. Disconnect the DSC HU/CM connector..
2. Connect the negative battery cable..
3. Attach the tester lead to the DSC HU/CM wiring harness-side connector and
inspect voltage, continuity, or resis ...
 DSC Off Switch Inspection
1. Remove the DSC OFF switch..
2. Verify that the continuity between the DSC OFF switch terminals is as indicated
in the table.
If not as indicated in the table, replace the DSC OFF switch ...
Other materials:
Receiving an Incoming Call
When an incoming call is received, the incoming call notification screen is
displayed. The
“Incoming Call Notifications” setting must be on.
Refer to Communication Settings on .
To accept the call, press the pick-up button on the audio control switch or
select on
the screen.
To rejec ...
Input/Turbine Speed Sensor Inspection [FS5 A EL]
CAUTION:
Water or foreign objects entering the connector can cause a poor connection
or corrosion. Be sure not to drop water or foreign objects on the connector
when disconnecting it.
On-Vehicle Inspection
1. Perform the following procedures.
a. Remove the battery cover..
b. ...
Floor Covering Removal/Installation
1. Disconnect the negative battery cable..
2. Remove the following parts:
a. Front seat.
b. Audio amplifier (Vehicles with Bose®).
c. Front scuff plate.
d. Joint cover.
e. Front side trim.
f. Fuel-filler lid opener lever bezel.
g. Selector lever knob (ATX).
h. Shift lever knob (MTX ...
