
Mazda 3 Service Manual: Input/Turbine Speed Sensor Inspection [FS5 A EL]
CAUTION:
-
Water or foreign objects entering the connector can cause a poor connection or corrosion. Be sure not to drop water or foreign objects on the connector when disconnecting it.
On-Vehicle Inspection
1. Perform the following procedures.
a. Remove the battery cover..
b. Disconnect the negative battery cable.
c. Remove the air cleaner component..
d. Disconnect the input/turbine speed sensor connector.
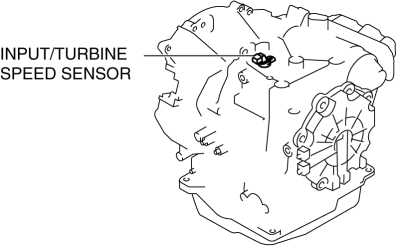
2. Measure the resistance between the input/turbine speed sensor terminals A and B.
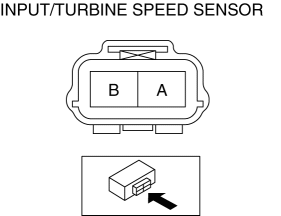
-
If there is any malfunction, replace the input/turbine speed sensor..
-
Input/turbine speed sensor specification
-
250—600 ohms
Off-Vehicle Inspection
1. Measure the resistance between the input/turbine speed sensor terminals A and B.
-
If there is any malfunction, replace the input/turbine speed sensor..
-
Input/turbine speed sensor specification
-
250—600 ohms
 Brake Switch Inspection
CAUTION:
Inspect the brake switch with it installed to the brake pedal, otherwise
the brake switch may not operate normally. If the brake switch is removed from
the brake pedal, replace ...
 Input/Turbine Speed Sensor Removal/Installation [FS5 A EL]
CAUTION:
Always use a new bolt. If the removed input/turbine speed sensor installation
bolt is reused, it may cause oil leakage.
A sealant coating is applied to the input/turbine s ...
Other materials:
Operating the Compact Disc (CD) Player
Type
Playable data
Music/MP3/WMA/
AAC CD player
Music data (CD-DA)
MP3/WMA/AAC file
NOTE
If a disc has both music data (CD-DA)
and MP3/WMA/AAC files, playback of the
two or three file types differs depending on
how the disc was reco ...
Control Switches
AUTO switch
By pressing the AUTO switch the
following functions will be automatically
controlled in accordance with the selected
set temperature:
Airflow temperature
Amount of airflow
Selection of airflow mode
Outside/Recirculated air selection
Air conditioner operation
NOTE
AUTO ...
Refrigerant Pressure Sensor Inspection [Manual Air Conditioner]
MZR 2.0, MZR 2.5
1. Install the manifold gauge.
2. Verify the high-pressure side reading of the manifold gauge.
3. Measure the terminal voltage of the climate control unit.
1G,1H and 2J
4. Verify that below graph as measure the terminal voltage 2J.
5. Follow the climate control ...
