Mazda 3 Service Manual: Engine Coolant Leakage Inspection [Mzr 2.0, Mzr 2.5]
WARNING:
-
Never remove the cooling system cap or loosen the radiator drain plug while the engine is running, or when the engine and radiator are hot. Scalding engine coolant and steam may shoot out and cause serious injury. It may also damage the engine and cooling system.
-
Turn off the engine and wait until it is cool. Even then, be very careful when removing the cap. Wrap a thick cloth around it and slowly turn it counterclockwise 2.5 turns. Step back while the pressure escapes.
-
When you are sure all the pressure is gone, turn the cap using the cloth, and remove it.
1. Inspect the engine coolant level..
2. Remove the cooling system cap.
3. Install the SST
or aftermarket equivalent and a radiator cap tester to the coolant reserve tank filler port.
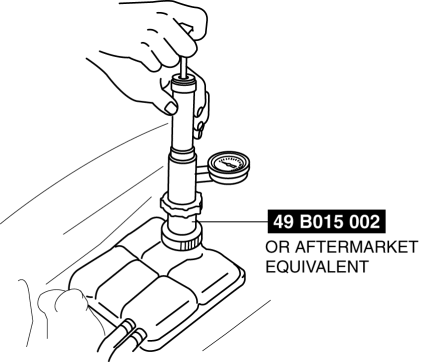
4. Apply pressure using the radiator cap tester.
CAUTION:
-
Applying more than 155 kPa {1.58 kgf/cm2, 22.5 psi} can damage the hoses, fittings, and other components, and cause leakage.
-
Engine coolant leakage inspection pressure
-
155 kPa {1.58 kgf/cm2, 22.5 psi} [1 min]
5. When pressurizing the cooling system, verify that the pressure is maintained.
-
If the gauge needle drops, it may indicate water leakage. Repair or replace the applicable part.
 Cooling System Service Warnings [Mzr 2.0, Mzr 2.5]
WARNING:
Never remove the cooling system cap or loosen the radiator drain plug while
the engine is running, or when the engine and radiator are hot. Scalding engine
coolant and steam may ...
 Engine Coolant Level Inspection [Mzr 2.0, Mzr 2.5]
WARNING:
Never remove the cooling system cap or loosen the radiator drain plug while
the engine is running, or when the engine and radiator are hot. Scalding engine
coolant and steam may ...
Other materials:
Condenser Inspection
1. Inspect the condenser for cracks, damage, and oil leakage.
If there is any malfunction, replace the condenser.
2. Visually inspect the fins for clogging of foreign material.
If any fins are clogged, remove the foreign material.
3. Visually inspect for bent fins.
...
Side Step Molding Installation
NOTE:
Double-sided adhesive tape has already been adhered to a new side step molding
for installation.
When a side step molding is to be reused, perform the following procedure:
1. Remove any grease or dirt from the affixing surface of the side step molding.
2. Affix double-si ...
Rear Tilt Motor Inspection
1. Remove the battery cover..
2. Disconnect the negative battery cable and wait 1 min or more..
3. Disconnect the rear tilt motor connector.
4. Apply battery positive voltage to the rear tilt motor terminals and inspect
the rear tilt motor operation
If not as specified, replace t ...
