Mazda 3 Service Manual: Front Shock Absorber Disposal
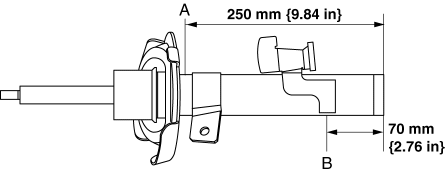
1. Place the front shock absorber on a level surface or with the piston pointing downwards.
2. Drill a 2—3 mm {0.08—0.11 in}
hole at the point A shown in the figure so that the gas can escape.

WARNING:
-
Whenever drilling into a shock absorber, wear protective eye wear. The gas in the shock absorber is pressurized and could spray metal chips into the eyes and face.
3. Drill a 2—3 mm {0.08—0.11 in}
hole at the point B shown in the figure to drain the oil.
4. Turn the hole made in Step 3 downwards and drain the oil by pumping the piston rod up and down several times.
5. Cut off the end of the front shock absorber.
6. Dispose of waste oil according to local waste disposal laws.
 Front Shock Absorber And Coil Spring Removal/Installation
CAUTION:
Performing the following procedures without first removing the ABS wheel-speed
sensor may possibly cause an open circuit in the wiring harness if it is pulled
by mistake. Before ...
 Front Shock Absorber Inspection
1. Remove the front shock absorber..
2. Inspect for damage and oil leakage.
3. Compress and extend the front shock absorber piston rod at least three
times at a steady rate. From the fourth comp ...
Other materials:
Front Seat Belt Pretensioner and Load Limiting Systems
For optimum protection, the driver and
front passenger seat belts are equipped
with pretensioner and load limiting
systems. For both these systems to work
properly you must wear the seat belt
properly.
Pretensioners:
When a collision is detected, the
pretensioners deploy simultaneously wit ...
Back Up Light Switch Removal/Installation [G35 M R]
1. Remove the battery cover..
2. Disconnect the negative battery cable.
3. Remove the battery component. (ex: battery, battery tray and PCM component).
4. Remove the aerodynamic under cover No.2..
5. Drain the oil from the transaxle..
6. Disconnect the back-up light switch connector and r ...
Floor Covering Removal/Installation
1. Disconnect the negative battery cable..
2. Remove the following parts:
a. Front seat.
b. Audio amplifier (Vehicles with Bose®).
c. Front scuff plate.
d. Joint cover.
e. Front side trim.
f. Fuel-filler lid opener lever bezel.
g. Selector lever knob (ATX).
h. Shift lever knob (MTX ...
