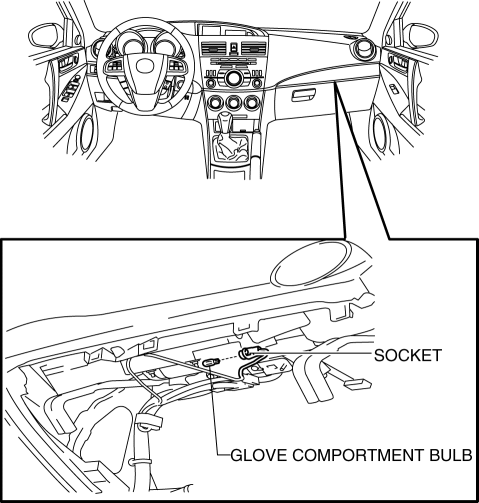
Mazda 3 Service Manual: Glove Compartment Light Bulb Removal/Installation
1. Disconnect the negative battery cable..
2. Remove the following parts:
a. Passenger-side front scuff plate.
b. Passenger-side front side trim.
c. Dashboard under cover.
d. Glove compartment.
e. Passenger-side lower panel.
3. Remove the glove comportment bulb from the socket.
4. Install in the reverse order of removal.
 Console Removal/Installation
1. Disconnect the negative battery cable..
2. Remove the following parts:
a. Upper panel.
b. Shift knob (MTX).
c. Selector lever knob (ATX).
d. Shift panel.
e. Side wall.
3. Remove the b ...
 Glove Compartment Removal/Installation
CAUTION:
If the glove compartment is closed without being joined to the stay damper,
the stay damper may be damaged. Verify that the stay damper is joined to the
glove compartment before ...
Other materials:
Seat Precautions
WARNINGMake sure the adjustable components of a seat
are locked in place:
Adjustable seats and seatbacks that are not securely locked are
dangerous. In a
sudden stop or collision, the seat or seatback could move, causing
injury. Make sure the
adjustable components of the ...
If your vehicle needs to be towed
If your Subaru Solterra requires towing, it is strongly recommended
to use an authorized SUBARU dealer or a professional towing service equipped with
a wheel-lift or flatbed truck for safe transportation.
Always ensure that a proper safety chain system is used during towing,
and strictly foll ...
Input/Turbine Speed Sensor Inspection [FS5 A EL]
CAUTION:
Water or foreign objects entering the connector can cause a poor connection
or corrosion. Be sure not to drop water or foreign objects on the connector
when disconnecting it.
On-Vehicle Inspection
1. Perform the following procedures.
a. Remove the battery cover..
b. ...
