Mazda 3 Service Manual: Installation Of Radio System
The control modules and control unit have been designed with sufficient attention to radio wave disturbances from the outside. However, observe the following precautions when installing the radio set to the vehicle to prevent adverse effects on the control modules and control unit.
-
Install the radio set and its antenna as far away as possible from the control modules and control unit.
-
The antenna feeder and power cable generate radio waves, therefore, keep them 100 mm {3.94 in} or more
from the control modules, control unit, and wiring harness. If the antenna feeder and power cable cross over the wiring harness, place them perpendicular to the wiring harness.
-
Do not install a high output radio set.
-
Do not use the control modules and control unit power source for the radio set. In addition, do not use the cigar lighter and accessory socket power source.
-
Do not attach the antenna feeder or wiring harness of the radio set to the wiring harness, fuel pipe, or brake tube of the vehicle.
-
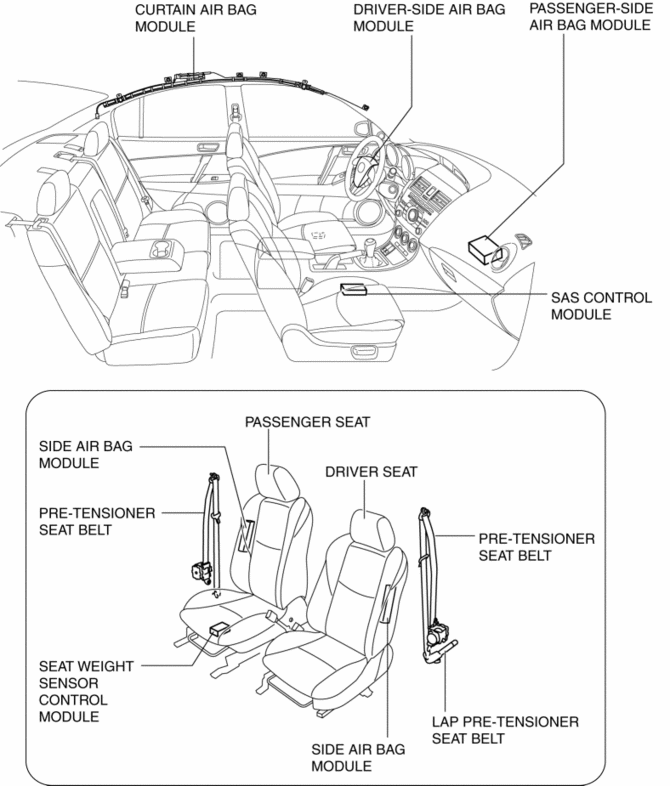
Do not install any radio set-related devices in the area where the air bag module deploys to prevent a secondary accident if the air bag were to deploy.
-
After installing the radio set, perform a test transmission with the engine idling to verify that it does not affect engine control.
 Glass Antenna Inspection
4SD
1. Disconnect the negative battery cable..
2. Disconnect the antenna amplifier connector B..
3. Disconnect the antenna feeder No.3 connector C. (with audio unit (with display)).
4. Inspect ...
 Keyless Antenna Removal/Installation
Interior, Front
1. Disconnect the negative battery cable..
2. Remove the following parts:
a. Upper panel.
b. Shift knob (MTX).
c. Selector lever knob (ATX).
d. Shift panel.
e. Side wall. ...
Other materials:
Refrigerant Pressure Sensor Inspection [Manual Air Conditioner]
MZR 2.0, MZR 2.5
1. Install the manifold gauge.
2. Verify the high-pressure side reading of the manifold gauge.
3. Measure the terminal voltage of the climate control unit.
1G,1H and 2J
4. Verify that below graph as measure the terminal voltage 2J.
5. Follow the climate control ...
Head restraints
In the Subaru Solterra, head restraints are installed on every seat
and are engineered to provide crucial support for the head and neck, helping to
reduce the risk of injury during sudden braking or collisions.
WARNING
■ Head restraint precautions
Always follow these safety recommendations ...
Using LATCH Lower Anchor
Your Mazda is equipped with LATCH lower anchors for attachment of specially
designed
LATCH child-restraint systems in the rear seats. Both anchors must be used,
otherwise the
seat will bounce around and put the child in danger. Most LATCH child-restraint
systems
must also be used in conjunc ...
