Mazda 3 Service Manual: Keyless Antenna Removal/Installation
Interior, Front
1. Disconnect the negative battery cable..
2. Remove the following parts:
a. Upper panel.
b. Shift knob (MTX).
c. Selector lever knob (ATX).
d. Shift panel.
e. Side wall.
f. Center panel.
g. Audio unit.
h. Rear heat duct (1).
3. Disconnect the connector.
4. Remove the nuts.
5. Remove the keyless antenna.
6. Install in the reverse order of removal.
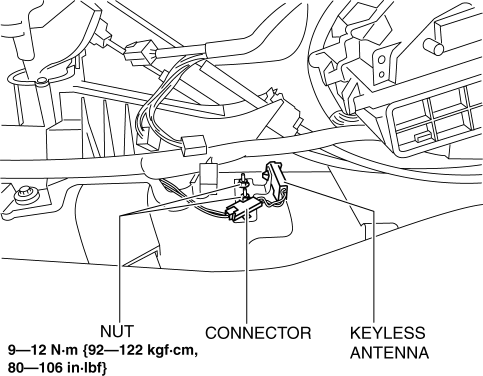
Interior, Rear
1. Disconnect the negative battery cable..
2. Remove the rear seat cushion..
3. Disconnect the connector.

4. Remove the nuts.
5. Remove the keyless antenna.
6. Install in the reverse order of removal.
Exterior, Rear
1. Disconnect the negative battery cable..
2. Remove the rear combination light..
3. Remove the rear bumper..
4. Remove the nuts.
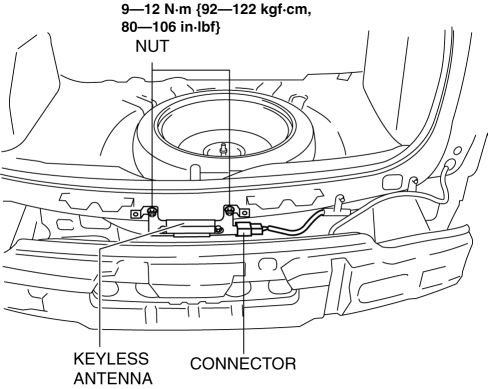
5. Disconnect the connector.
6. Remove the keyless antenna.
7. Install in the reverse order of removal.
Exterior, LF/RF
NOTE:
-
The keyless antenna (vehicle exterior, LF/RF) is built into the front outer handle..

 Installation Of Radio System
The control modules and control unit have been designed with sufficient attention
to radio wave disturbances from the outside. However, observe the following precautions
when installing the radio ...
 Rear Center Speaker Inspection
1. Disconnect the negative battery cable..
2. Remove the following parts:
a. Rear seat cushion.
b. Rear scuff plate.
c. Tire house trim.
d. C-pillar trim.
e. Rear package trim.
f. Rear c ...
Other materials:
Battery Recharging [Mzr 2.0, Mzr 2.5]
Using GR8-1291:
(See GR8-1291 INSTANT TRAINING MODULE (VIDEO) .)
WARNING:
Keep all flames away from the battery, otherwise evaporated gas from the
battery fluid may catch fire and cause serious injury.
1. Remove the battery filler caps and check the water level. If necessary, add ...
Input/Turbine Speed Sensor Removal/Installation [FS5 A EL]
CAUTION:
Always use a new bolt. If the removed input/turbine speed sensor installation
bolt is reused, it may cause oil leakage.
A sealant coating is applied to the input/turbine speed sensor installation
bolt to prevent oil leakage from the installation bolt hole which passes ...
Oil Pump Removal/Installation [Mzr 2.0, Mzr 2.5]
WARNING:
Hot engines and engine oil can cause severe burns. Turn off the engine and
wait until it and the engine oil have cooled.
A vehicle that is lifted but not securely supported on safety stands is dangerous.
It can slip or fall, causing death or serious injury. Never work ...
