Mazda 3 Service Manual: Oil Control Valve (OCV) Inspection [Skyactiv G 2.0]
Coil Resistance Inspection
1. Remove the battery cover..
2. Disconnect the negative battery cable..
3. Remove the plug hole plate..
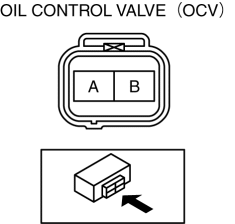
4. Disconnect the OCV connector.
5. Measure the resistance between terminals A and B using an ohmmeter.
-
OCV coil resistance
-
6.9—7.5 ohms [20°C {68°F}]
-
If not as specified, replace the OCV..
6. Install in the reverse order of removal.
Spool Valve Operation Inspection
1. Remove the battery cover..
2. Disconnect the negative battery cable..
3. Remove the OCV..
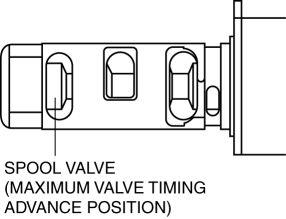
4. Verify that the spool valve in the OCV is in the maximum valve timing advance position as indicated in the figure.
-
If not as specified, replace the OCV..
5. Verify that the battery is fully charged..
-
If not as specified, recharge the battery..
NOTE:
-
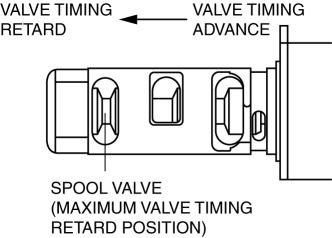
When applying battery positive voltage between the OCV terminals, the connection can be either of the following:
-
Positive battery cable to terminal A, negative battery cable to terminal B
-
Positive battery cable to terminal B, negative battery cable to terminal A
6. Apply battery positive voltage between the OCV terminals and verify that the spool valve operates and moves to the maximum valve timing retard position.
-
If not as specified, replace the OCV..
7. Stop applying battery positive voltage and verify that the spool valve returns to the maximum valve timing advance position.
-
If not as specified, replace the OCV..
8. Install the OCV..
 Oil Control Valve (OCV) Inspection [Mzr 2.3 Disi Turbo]
Coil Resistance Inspection
1. Remove the battery cover..
2. Disconnect the negative battery cable..
3. Disconnect the OCV connector.
4. Measure the coil resistance between terminals A and B usi ...
 Oil Control Valve (OCV) Removal/Installation [Mzr 2.0, Mzr 2.5]
1. Remove the battery cover..
2. Disconnect the negative battery cable..
3. Remove the plug hole plate..
4. Disconnect the wiring harness.
5. Remove the ignition coils..
6. Remove the ventil ...
Other materials:
Safe Exit Assist
The Subaru Solterra Safe Exit Assist is an advanced safety feature
that utilizes rear side radar sensors mounted inside the rear bumper to monitor
approaching vehicles and bicycles. This intelligent system helps occupants determine
whether opening a door could result in a collision, significan ...
Quick Release Connector (Emission System) Removal/Installation [Mzr 2.0, Mzr
2.5]
Quick Release Connector Type
CAUTION:
Verify the type and location, and install/remove properly.
Except for Mexico
Mexico
Type A Removal
CAUTION:
Be careful not to damage the evaporative pipe when unlocking the retainer.
NOTE:
When removing the quick r ...
For your information
Main Owner's Manual
This comprehensive Owner’s Manual for the Subaru Solterra has been carefully
designed to cover the full range of models, trims, and available equipment, including
optional features that may not be installed on your specific vehicle. As a result,
you may encounter descrip ...
