Mazda 3 Service Manual: Oil Seal (Differential) Replacement [G35 M R]
1. On level ground, jack up the vehicle and support it evenly on safety stands.
2. Remove the aerodynamic under cover No.2..
3. Drain the oil from the transaxle..
4. Remove the front splash shield..
5. Separate the drive shaft and joint shaft from the transaxle..
6. Remove the oil seals using a screwdriver.
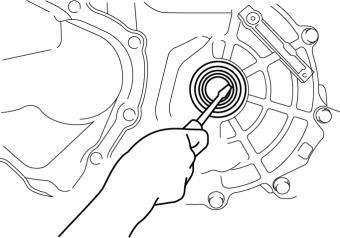
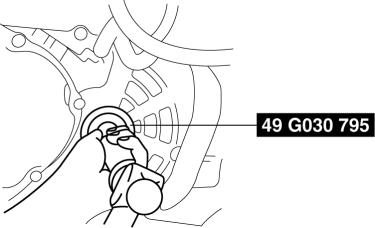
7. Using the SST
and a hammer, tap each new oil seal in evenly until the SST
contacts the transaxle case.
8. Coat the lip of each oil seal with transaxle oil.
9. Insert the drive shaft and joint shaft to the transaxle..
10. Install the front splash shield..
11. Add the specified amount and type of oil..
12. Install the aerodynamic under cover No.2..
 Oil Seal (Differential) Replacement [Fw6 A EL]
1. Remove the aerodynamic under cover No.2 and the splash shield as a single
unit..
2. Remove the oil seal.
a. Drain the ATF..
b. Disconnect the drive shaft (LH) from the transaxle..
c. Disc ...
 Oil Seal (Differential) Replacement [G66 M R]
1. On level ground, jack up the vehicle and support it evenly on safety stands.
2. Remove the aerodynamic under cover No.2..
3. Drain the oil from the transaxle..
4. Remove the front splash shi ...
Other materials:
Rear Crossmember Removal/Installation
CAUTION:
Performing the following procedures without first removing the ABS wheel-speed
sensor may possibly cause an open circuit in the wiring harness if it is pulled
by mistake. Before performing the following procedures, disconnect the ABS wheel-speed
sensor wiring harness connec ...
Transaxle Oil Inspection [G66 M R]
1. Park the vehicle on level ground.
2. Remove the aerodynamic under cover No.2..
3. Remove the oil level plug and washer.
4. Verify that the oil is near the brim of the plug port.
If the oil level is lower than the low level, add the specified amount and
type of oil through the ...
Variable Valve Timing Actuator Inspection [Mzr 2.0, Mzr 2.5]
CAUTION:
Variable valve timing actuator can not be disassembled because it is a precision
unit.
1. Remove the battery cover..
2. Disconnect the negative battery cable..
3. Remove the plug hole plate..
4. Disconnect the wiring harness.
5. Remove the ignition coils..
6. Remo ...
