Mazda 3 Service Manual: Oil Seal Replacement [FS5 A EL]
1. Remove the aerodynamic under cover No. 2..
2. Remove the oil seal.
a. Drain the ATF..
b. Remove the drive shaft and/or joint shaft..
CAUTION:
-
The oil seal is easily damaged by the sharp edges of the drive shaft splines. Do not let the splines contact the oil seal.
c. Remove the oil seal using a flathead screwdriver.
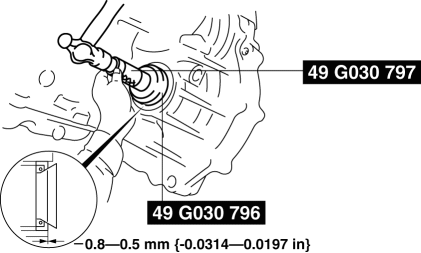
3. Using the SSTs and a hammer, tap a new oil seal in evenly until the SST (body) contacts the transaxle case.
4. Coat the lip of the oil seal with ATF.
5. Install the drive shaft and/or joint shaft..
6. Add the ATF..
7. Install the aerodynamic under cover No. 2..
8. Perform the “Mechanical System Test”..
 Oil Seal (Differential) Replacement [G66 M R]
1. On level ground, jack up the vehicle and support it evenly on safety stands.
2. Remove the aerodynamic under cover No.2..
3. Drain the oil from the transaxle..
4. Remove the front splash shi ...
 Rear Oil Seal Replacement [Mzr 2.0, Mzr 2.5]
1. Remove the transaxle..
2. Remove the flywheel (MTX) or the drive plate (ATX)..
3. Remove in the order indicated in the table.
4. Install in the reverse order of removal.
1
...
Other materials:
Electric Power Steering Oil Pump Component Disassembly/Assembly
CAUTION:
The internal parts of the EHPAS control module and motor could be damaged
if they receive an impact. Be careful when handling the EHPAS control module
and motor to prevent the component from getting hit. Replace the electric power
steering oil pump component if it has recei ...
Fuel Tank Inspection [Mzr 2.0, Mzr 2.5]
WARNING:
Fuel is very flammable liquid. If fuel spills or leaks from the pressurized
fuel system, it will cause serious injury or death and facility breakage. Fuel
can also irritate skin and eyes. To prevent this, always complete the “Fuel
Line Safety Procedure”, while referring ...
Parking Brake Cable Removal/Installation
1. Remove the following parts:
a. Upper panel.
b. Shift knob (MTX).
c. Selector lever knob (ATX).
d. Shift panel.
e. Side wall.
f. Console.
2. Remove the under cover..
3. Remove the tunnel member (rear). (MZR 2.0, MZR 2.5, MZR 2.3 DISI Turbo).
4. Remove the brace bar. (SKYACTIV-G ...
