Mazda 3 Service Manual: Pressure Sensor Removal/Installation [Two Step Deployment Control System]
1. Switch the ignition to off.
2. Disconnect the negative battery cable and wait for 1 min or more
..
3. Remove the inner garnish..
4. Remove the front door trim..
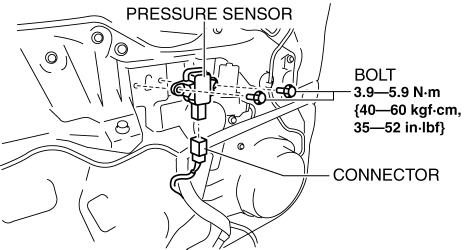
5. Remove the bolts.

6. Remove the pressure sensor.
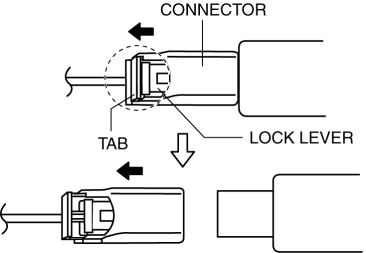
7. Disconnect the connector from the pressure sensor by pressing the connector tab and pulling out the lock lever in the direction of the arrow.

-
When connecting the pressure sensor connector, insert the lock lever (connector disconnection prevention lever) completely.
8. Install in the reverse order of removal.
9. Switch the ignition to ON.
10. Verify that the air bag system warning light illuminates for approx. 6 s
and goes out.
-
If the air bag system warning light does not operate normally, refer to the on-board diagnostic system (air bag system) and perform inspection of the system..
 Passenger Side Air Bag Module Removal/Installation [Two Step Deployment Control
System]
WARNING:
Handling the air bag module improperly can accidentally deploy the air bag
module, which may seriously injure you. Read the air bag system service warnings
and cautions before h ...
 Restraints SST [Standard Deployment Control System]
49 H066 002
Deployment tool
49 D066 002
Adapter harness
49 L066 002
Adapter harness
49 B066 ...
Other materials:
Afs (Adaptive Front Lighting System) Control Module Removal/Installation
NOTE:
Perform the auto leveling system initialization after newly replacing the
AFS control module to assure that the auto leveling system operates correctly.
1. Disconnect the negative battery cable..
2. Remove the following parts:
a. Passenger-side front scuff plate.
b. Pass ...
Front Door Checker Removal/Installation
1. Fully close the front door glass.
2. Disconnect the negative battery cable..
3. Remove the inner garnish..
4. Remove the front door trim..
5. Remove the front door speaker..
6. Remove the bolt A.
7. Remove the bolts B.
8. Pull out the front door checker from the front speake ...
A/C Unit Removal/Installation
1. Set the air mix mode to MAX COLD.
2. Disconnect the negative battery cable..
3. Discharge the refrigerant..
4. Drain the engine coolant..
5. Remove the plug hole plate.
6. Remove the charge air cooler cover. (MZR 2.3 DISI Turbo).
7. Remove the insulator. (MZR 2.3 DISI Turbo)
8. ...
