Mazda 3 Service Manual: Disc Pad (Rear) Replacement
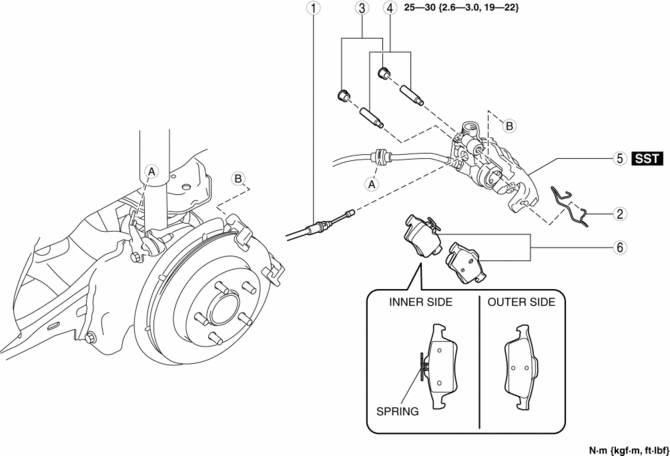
1. Remove in the order indicated in the table.
2. Install in the reverse order of removal.
3. After installation, pump the brake pedal a few times and inspect the following:
-
Parking brake lever stroke
-
Brake drag
|
1 |
Parking brake cable (See PARKING BRAKE LEVER REMOVAL/INSTALLATION.) |
|
2 |
Retaining clip (See REAR BRAKE (DISC) REMOVAL/INSTALLATION.) |
|
3 |
Cap |
|
4 |
Bolt |
|
5 |
Caliper (See Caliper Installation Note.) |
|
6 |
Disc pad |
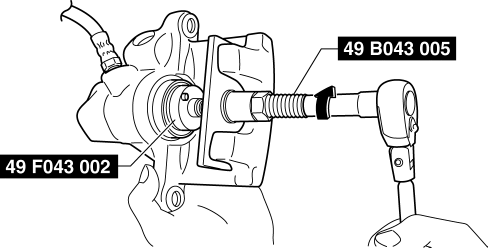
Caliper Installation Note
1. Clean the exposed area of the piston.
2. Install the SST
(49 F043 002) to the SST
(49 B043 005).
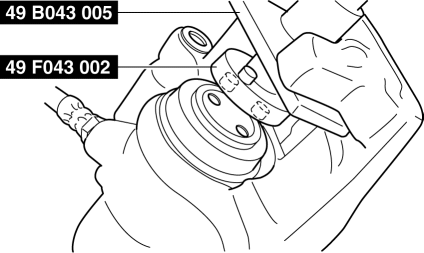
3. Align the SST
projection to the piston groove.
4. Rotate part A on the SST
in the direction of the arrow and secure the SST
to the caliper.
5. Rotate the SST
in the direction of the arrow and push the piston completely into the caliper.
NOTE:
-
Even with the piston completely pushed in, the top of the piston projects from the dust seal by approximately 2 mm
{0.09 in}
.
6. Rotate part A on the SST
in the direction of the arrow using the tool and remove the SST
from the caliper.
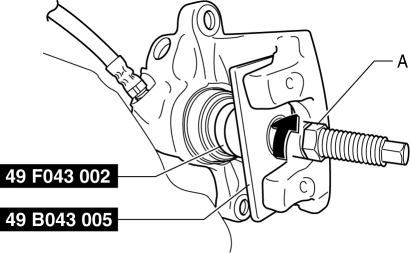
7. Install the caliper to the vehicle.
 Disc Pad (Front) Replacement [Mzr 2.3 Disi Turbo]
1. Remove in the order indicated in the table.
2. Install in the reverse order of removal.
3. After installation, pump the brake pedal a few times and verify that the brakes
do not drag.
...
 General Procedures (Brake)
Wheel and Tire Installation
1. When installing the wheels and tires, tighten the wheel nuts in a criss-cross
pattern to the following tightening torque.
Tightening torque
88—118 N·m { ...
Other materials:
Heated Oxygen Sensor (HO2 S) Removal/Installation [Mzr 2.0, Mzr 2.5]
WARNING:
A hot engine and exhaust system can cause severe burns. Turn off the engine
and wait until they are cool before removing the exhaust system.
1. Remove the battery cover..
2. Disconnect the negative battery cable..
3. Disconnect the HO2S connector.
4. Remove the HO2S u ...
Underbody Maintenance
Road chemicals and salt used for ice and
snow removal and solvents used for dust
control may collect on the underbody. If
not removed, they will speed up rusting
and deterioration of such underbody parts
as fuel lines, frame, floor pan, and exhaust
system, even though these parts may be
coate ...
Closing the Hood
Check under the hood area to make
certain all filler caps are in place and all
loose items (e.g. tools, oil containers,
etc.) have been removed.
Lift the hood, grasp the padded area on
the support rod, and secure the support
rod in the clip. Verify that the support
rod is secured in ...
