Mazda 3 Service Manual: Rear Bumper Disassembly/Assembly
1. Remove the License plate lights..
2. Disassemble in the order indicated in the table.
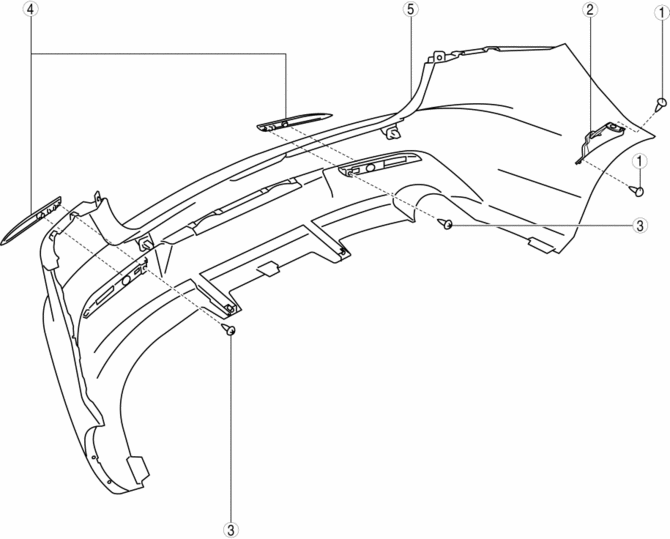
|
1 |
Fastener A |
|
2 |
Bracket |
|
3 |
Screw B |
|
4 |
Reflector (See Reflector Removal Note) |
|
5 |
Rear bumper fascia |
3. Assemble in the reverse order of disassembly.
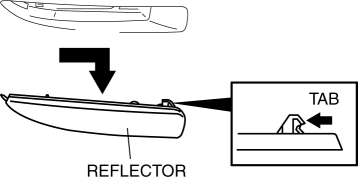
Reflector Removal Note
1. Remove the screws.
2. Lift the reflector up in the direction of the arrow, then unhook it from the rear bumper.
 Rear Beltline Molding Removal/Installation
1. Fully open the rear door glass.
2. Remove the rear door trim..
3. Remove clip A using a fastener remover and pull up the rear beltline molding
in the direction of the arrow (1) shown in the f ...
 Rear Bumper Reinforcement Removal/Installation
1. Disconnect the negative battery cable..
2. Remove the rear combination light..
3. Remove the rear bumper..
4. Remove the nuts and remove the rear bumper reinforcement.
5. Install in the ...
Other materials:
Recording of Vehicle Data
This vehicle is equipped with a computer which records the following main
vehicle data
related to vehicle controls, operation, and other driving conditions.
Recorded data
Vehicle conditions such as engine speed and vehicle speed
Driving operation conditions such as accelerator and brake pe ...
Antenna (4-Door)
AM/FM Radio Antenna
The AM/FM radio antenna receives both
AM and FM signals.
The antenna is embedded into the window
glass.
CAUTION
When washing the inside of the
window which has an antenna, use
a soft cloth dampened in lukewarm
water, gently wiping the antenna lines.
U ...
Manual Transaxle Oil Replacement [C66 M R]
1. Park the vehicle on level ground.
2. Remove the aerodynamic under cover No.2..
3. Remove the drain plug and gasket, and drain the manual transaxle oil.
4. Install a new gasket and the drain plug.
Tightening torque
39—59 N·m {4.0—6.0 kgf·m, 29—43 ft·lbf}
5. Remove the oil ...
