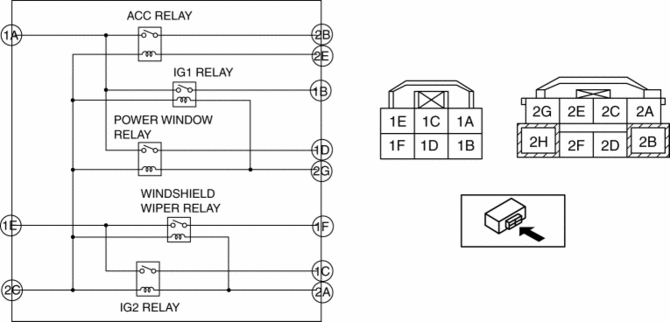
Mazda 3 Service Manual: Relay Block Inspection [With Advanced Keyless Entry And Push Button Start System]
1. Disconnect the negative battery cable..
2. Remove the following parts:
a. Driver-side front scuff plate.
b. Driver-side front side trim.
c. Hood release lever.
d. Upper panel.
e. Shift knob (MTX)(See MANUAL TRANSAXLE SHIFT MECHANISM REMOVAL/INSTALLATION [G66M-R].)(See MANUAL TRANSAXLE SHIFT MECHANISM REMOVAL/INSTALLATION [A26M-R].)
f. Selector lever knob (ATX)(See AUTOMATIC TRANSAXLE SHIFT MECHANISM REMOVAL/INSTALLATION.)
g. Shift panel.
h. Side wall.
i. Console.
j. Lower panel.
k. Knee bolster.
3. Remove the relay block..
4. Verify that the continuity is as indicated in the table.

-
If not as indicated in the table, replace the relay block.

 Forced Ignition On [With Advanced Keyless Entry And Push Button Start System]
NOTE:
In order to perform a forced ignition ON, the M-MDS (IDS) is necessary. If
the servicing is being done outside of an Authorized Mazda dealership, contact
an Authorized Mazda dealer ...
 Relay Block Removal/Installation [With Advanced Keyless Entry And Push Button
Start System]
1. Disconnect the negative battery cable..
2. Remove the following parts:
a. Driver-side front scuff plate.
b. Driver-side front side trim.
c. Hood release lever.
d. Upper panel.
e. Shift ...
Other materials:
Pressure Sensor Removal/Installation [Two Step Deployment Control System]
1. Switch the ignition to off.
2. Disconnect the negative battery cable and wait for 1 min or more..
3. Remove the inner garnish..
4. Remove the front door trim..
5. Remove the bolts.
6. Remove the pressure sensor.
7. Disconnect the connector from the pressure sensor by pressing the ...
Immobilizer System
The immobilizer system allows the
engine to start only with a key the system
recognizes.
If someone attempts to start the engine
with an unrecognized key, the engine
will not start, thereby helping to prevent
vehicle theft.
If you have a problem with the
immobilizer system or the key, co ...
Air Bleeding
CAUTION:
If the strainer is removed, impurities may penetrate the power steering system
and damage it. To prevent this, always bleed air with the strainer installed.
Do not maintain the steering wheel fully turned for 5 s or more. The oil
temperature could rise and damage ...
