Mazda 3 Service Manual: Roof Carrier Bracket Removal/Installation
4SD
1. Disconnect the negative battery cable..
2. Remove the following parts:
a. Sunroof seaming welt (vehicles with sunroof)
b. Front scuff plate.
c. Rear scuff plate.
d. A-pillar trim.
e. B-pillar lower trim.
f. Upper anchor of the front seat belt installation bolt.
g. B-pillar upper trim.
h. Rear seat cushion.
i. Tire house trim.
j. C-pillar trim.
k. Map light.
l. Sunvisor.
m. Assist handle.
n. Headliner.
3. Remove the nuts.
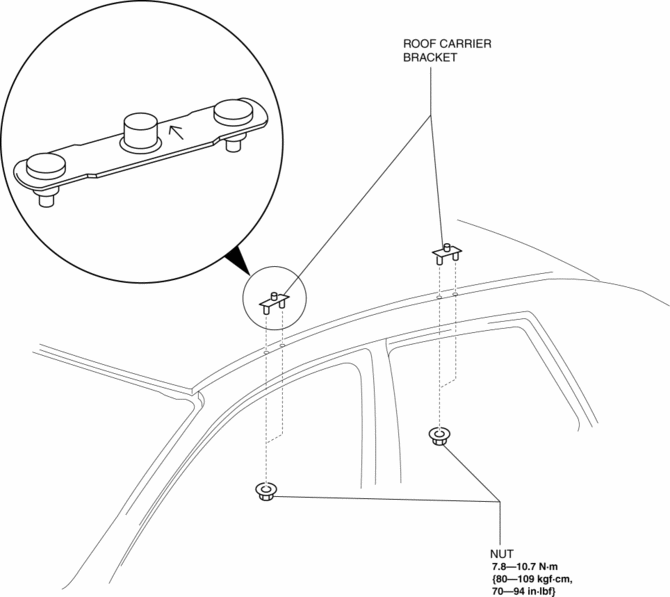
4. Remove the roof carrier bracket.
5. Install in the reverse order of removal.
NOTE:
-
Install the roof carrier bracket so that the arrow on it faces inward.
5HB
1. Disconnect the negative battery cable..
2. Remove the following parts:
a. Sunroof seaming welt (vehicles with sunroof)
b. Front scuff plate.
c. Rear scuff plate.
d. A-pillar trim.
e. B-pillar lower trim.
f. Upper anchor of the front seat belt installation bolt.
g. B-pillar upper trim.
h. Rear seat cushion.
i. Tire house trim.
j. Trunk side upper trim.
k. C-pillar trim.
l. Map light.
m. Sunvisor.
n. Assist handle.
o. Headliner.
3. Remove the nuts.
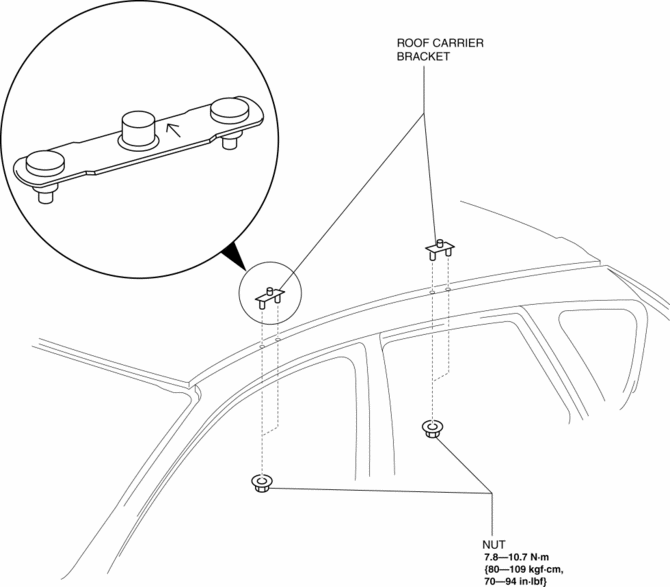
4. Remove the roof carrier bracket.
5. Install in the reverse order of removal.
NOTE:
-
Install the roof carrier bracket so that the arrow on it faces inward.
 Rear Drain Hose Removal
1. Disconnect the negative battery cable.
2. Remove the rain sensor cover. (Vehicles with auto light/wiper system).
3. Disconnect the rain sensor connector. (Vehicles with auto light/wiper system) ...
 Sunroof Motor Inspection
1. Disconnect the negative battery cable..
2. Remove the rain sensor cover. (Vehicles with auto light/wiper system).
3. Disconnect the rain sensor connector. (Vehicles with auto light/wiper system ...
Other materials:
Airflow Mode Actuator Removal/Installation [Full Auto Air Conditioner]
1. Set the air intake mode to FRESH.
2. Set the air mix mode to MAX COLD.
3. Disconnect the negative battery cable..
4. Remove the following parts:
a. Front doors.
b. Front scuff plate.
c. Front side trim.
d. Dashboard under cover.
e. Glove compartment.
f. Upper panel.
g. Shift l ...
Recommended Tire Inflation Pressure
On the tire label you will find the recommended tire inflation pressure in
both kPa and
psi for the tires installed as original equipment on the vehicle. It is very
important that the
inflation pressure of the tires on your vehicle is maintained at the
recommended pressure.
You should che ...
Recommendations for Shifting (for
Vehicles without Gear Shift
Indication)
Upshifting
For normal acceleration, Mazda
recommends these shift points:
(U.S.A. and Canada)
For cruising, Mazda recommends these
shift points:
(U.S.A. and Canada)
Downshifting
When you must slow down in heavy traffic
or on a steep upgrade , downshift before
the engine starts to ov ...
