Mazda 3 Service Manual: Seat Weight Sensor Inspection [Two Step Deployment Control System]
CAUTION:
-
If any of the following work is performed, perform the seat weight sensor inspection using the M-MDS.
-
Removal of the passenger-side seat
-
Loosening and retightening of passenger’s seat fixing bolts
-
Or, the vehicle is involved in a collision
-
If any of the following work is performed, perform the seat weight sensor calibration using the M-MDS..
-
Replacement with a new seat weight sensor
-
Replacement with a new seat weight sensor control module
-
Replacement with new passenger-side seat parts
-
Disassembly of the passenger-side seat
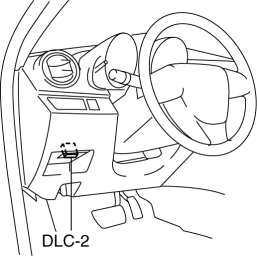
1. Connect the M-MDS (IDS) to the DLC-2.
2. After the vehicle is identified, select the following items from the initialization screen of the IDS.
a. Select “Body”.
b. Select “Restraints”.
3. Then, select item from the screen menu in the following order.
a. Select “Passenger Seat Weight Sensor ReZero”.
4. Then, select item from the SWS Calibration screen menu in the following order.
a. Select “(2)-When the passenger seat was removed and reinstalled.”
5. Perform inspection following the procedures on the M-MDS screen.
 Seat Weight Sensor Control Module Removal/Installation [Two Step Deployment
Control System]
Seat Weight Sensor Control Module Removal/Installation [Two Step Deployment
Control System]
CAUTION:
When the seat weight sensor control module is replaced with a new one, perform
the seat weight sensor calibration using the M–MDS..
1. Switch the ignition to off.
2. Disc ...
 Seat Weight Sensor Removal/Installation [Two Step Deployment Control System]
CAUTION:
When the seat weight sensor is replaced with a new one, perform the seat
weight sensor calibration using the M–MDS..
When replacing the seat weight sensor, replace it ...
Other materials:
Power Window Main Switch Inspection
1. Disconnect the negative battery cable.
2. Remove the inner garnish. (driver's side).
3. Remove the front door trim. (driver's side).
4. Remove the main switch panel. (driver's side).
5. Connect the power window main switch connector.
6. Connect the negative battery cable..
...
Supplemental Restraint System (SRS) Precautions
The front and side supplemental restraint systems (SRS) include different
types of air bags.
Please verify which kinds of air bags are equipped on your vehicle by locating
the
“SRS AIRBAG” location indicators. These indicators are visible in the area where
the air
bags are installed.
...
Front Crossmember Removal/Installation
CAUTION:
Performing the following procedures without first removing the ABS wheel-speed
sensor may possibly cause an open circuit in the wiring harness if it is pulled
by mistake. Before performing the following procedures, disconnect the ABS wheel-speed
sensor wiring harness connec ...
