Mazda 3 Service Manual: Shift Panel Removal/Installation
ATX
1. Remove the upper panel..
2. Remove the selector lever knob..
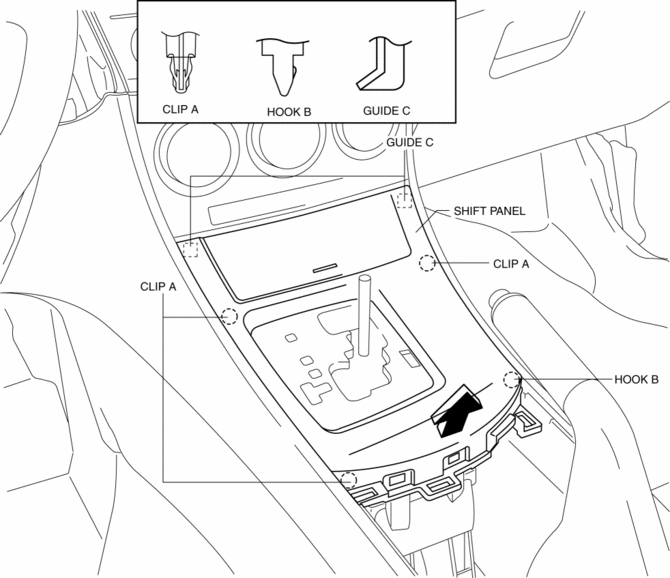
3. Pull the shift panel in the direction of the arrow shown in the figure and remove it while detaching the clips A, hook B and guides C.

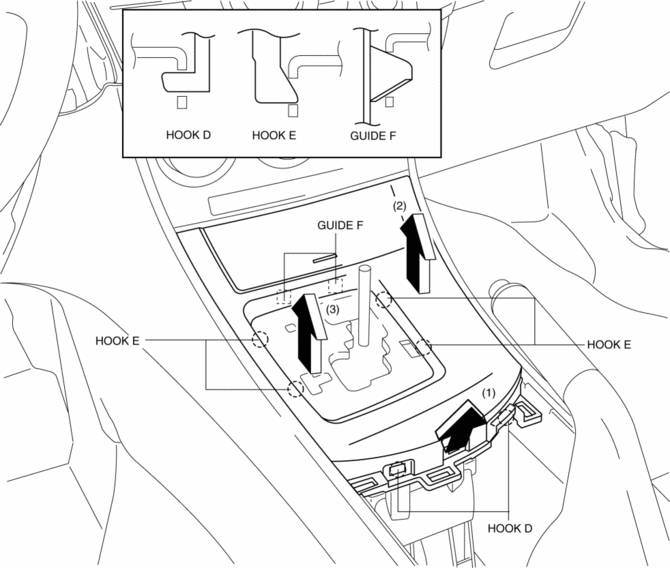
4. Pull the shift panel in the direction of the arrow (1), (2), (3) while remove the hooks D, E and guide F.

5. Remove the shift panel.
6. Install in the reverse order of removal.
MTX
1. Remove the upper panel..
2. Remove the shift knob..
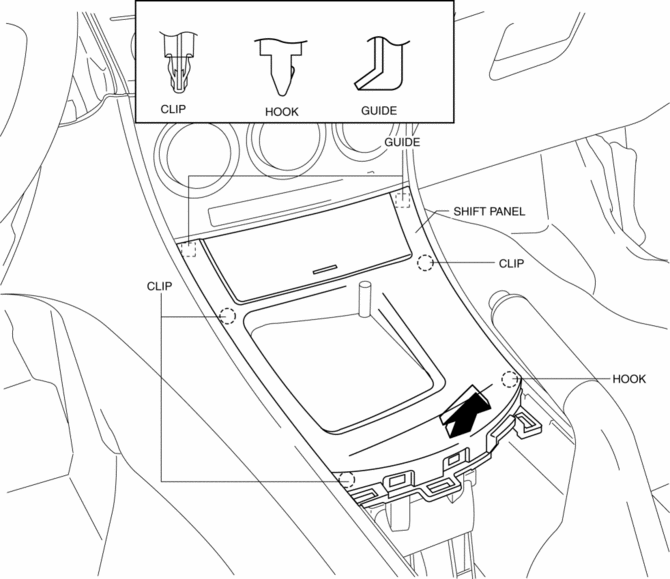
3. Pull the shift panel in the direction of the arrow shown in the figure and remove it while detaching the clips, hook and guides.

4. Remove the shift panel.
5. Install in the reverse order of removal.
 Rear Scuff Plate Removal/Installation
1. Detach tab A while pulling the rear scuff plate in the direction of the arrow
(1) shown in the figure, then detach hook B, clips C, pins D while pulling in the
direction of the arrow (2).
2. ...
 Side Wall Removal/Installation
1. Pull out the side wall in the direction shown in the direction of the arrow
shown in the figure, then remove the clips.
2. Remove the side wall in the direction of the arrow shown in the fi ...
Other materials:
Drive Belt Inspection [Skyactiv G 2.0]
Generator Drive Belt
NOTE:
The generator drive belt deflection/tension inspection is not necessary with
the adoption of the drive belt auto tensioner.
1. Verify that the indicator part of the cast hexagon on the drive belt auto
tensioner is within the normal range.
If ...
Rear Buckle Removal/Installation
Rear Buckle (RH) and Rear Buckle (Center)
1. Remove the rear seat cushion..
2. Remove the bolt.
3. Remove the rear buckle (RH) and rear buckle (center).
4. Install in the reverse order of removal.
Rear Buckle (LH)
1. When removing or installing the rear buckle (LH), refer to the rear ...
Electric Power Steering Oil Pump Component Removal/Installation
CAUTION:
Be careful not to drop the electric power steering oil pump component as
the internal parts of the EHPAS CM could be damaged. Replace the electric power
steering oil pump component if it is subjected to an impact.
1. Remove the front mudguard (RH)..
2. Remove the aerod ...
