
Mazda 3 Service Manual: Sunvisor Removal/Installation
1. Disconnect the negative battery cable..
2. Remove the screw.
3. Rotate the sunvisor in the direction of the arrow.
4. Unhook and remove the sunvisor.
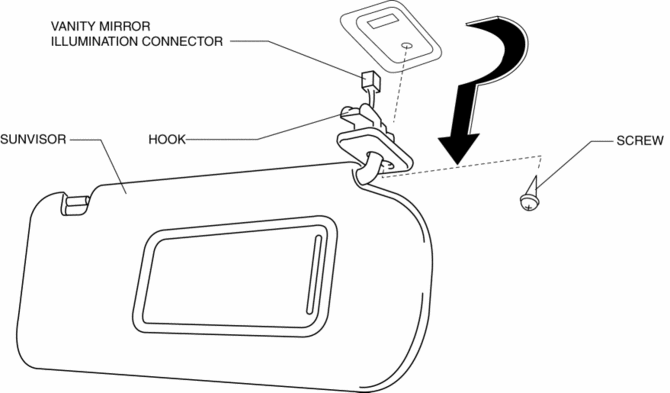
5. Disconnect the vanity mirror illumination connector. (Vehicles with vanity mirror illumination)
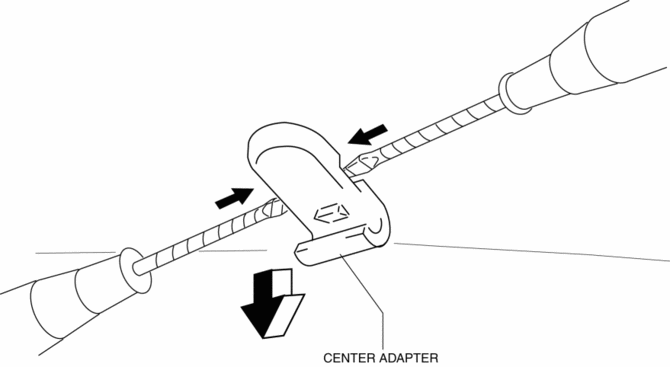
6. Press the center adaptor tabs as shown in the figure using two tape-wrapped flathead screwdrivers, and remove the center adaptor.
7. Install in the reverse order of removal.
 Knee Bolster Removal/Installation
1. Disconnect the negative battery cable..
2. Remove the following parts:
a. Driver-side front scuff plate.
b. Driver-side front side trim.
c. Hood release lever.
d. Upper panel.
e. Shift ...
 Lighting & Horn
...
Other materials:
PID/Data Monitor Inspection [Blind Spot Monitoring (Bsm)]
1. Connect the M-MDS (IDS) to the DLC-2.
2. After the vehicle is identified, select the following items from the initialization
screen of the IDS.
a. Select “DataLogger”.
b. Select “Modules”.
c. Select “BSML” or “BSMR”.
3. Select the applicable PID from the PID table. ...
Transmission/Transaxle SST
1: Mazda SST number
2: Global SST number
Example
1:49 UN30 3009
2:303-009
Crankshaft damper remover
Clutch [G35M-R]
1:49 E011 1A0
2: –
Ring gear brake set
1:49 SE01 310A
2: –
Clutch disc center ...
Steering Wheel And Column Inspection
Play Inspection
1. With the wheels in the straight-ahead position, start the engine.
2. Turn the steering wheel to the left and right gently, then verify that the
steering wheel play is within the specification.
Steering wheel play
0—30 mm {0—1.18 in} (When hydraulic operating)
...
