Mazda 3 Service Manual: Trunk Lid Lock Striker Removal/Installation
1. Remove the trunk end trim..
2. Disconnect the trunk lid lock striker from the trunk lid opener cable.
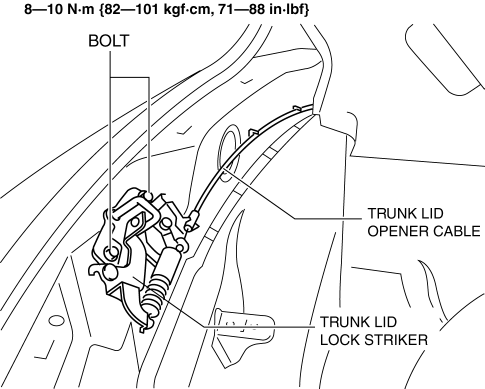
3. Remove the bolts, then remove the trunk lid lock striker.
4. Install in the reverse order of removal.
5. Adjust the trunk lid lock striker..
 Trunk Lid Latch Switch Inspection
1. Disconnect the negative battery cable..
2. Remove the trunk lid trim..
3. Remove the trunk lid latch and lock actuator..
4. Press the latch in using a flathead screwdriver to inspect the latc ...
 Trunk Lid Opener Cable Removal/Installation
1. Disconnect the negative battery cable..
2. Remove the following parts:
a. Front seat (LH)(See FRONT SEAT REMOVAL/INSTALLATION.)
b. Front scuff plate (LH).
c. Rear scuff plate.
d. B-pillar ...
Other materials:
Cleaning the Upholstery and
Interior Trim
Vinyl
Remove dust and loose dirt from vinyl
with a whisk broom or vacuum cleaner.
Clean vinyl with a leather-and-vinyl
cleaner.
Leather *
Remove dust and sand first using a
vacuum cleaner or other means, then wipe
dirt off using a soft cloth with a leather
cleaner or a soft cloth soaked i ...
Identification Numbers
Vehicle Identification Number
The vehicle identification number legally
identifies your vehicle. The number is on a
plate attached to the cowl panel located on
the left corner of the dashboard. This plate
can easily be seen through the windshield
Motor Vehicle Safety Standard Label (U.S.A. ...
Washer Tank Removal/Installation
Vehicles with the washer fluid-level sensor
1. Disconnect the negative battery cable..
2. Remove the front bumper..
3. Remove in the order indicated in the table.
1
Washer motor connector
2
Windshield washer hose
3
...
