Mazda 3 Service Manual: Antenna Amplifier Removal/Installation
With Audio Unit (Without Display)
1. Disconnect the negative battery cable..
2. Remove the rain sensor cover. (Vehicles with auto light/wiper system).
3. Disconnect the rain sensor connector. (Vehicles with auto light/wiper system)
4. Partially peel back the seaming welts.
5. Remove the following parts:
a. Sunroof seaming welt (vehicles with sunroof)
b. A-pillar trim.
c. Front scuff plate.
d. Rear scuff plate.
e. B-pillar lower trim.
f. Upper anchor of the front seat belt.
g. B-pillar upper trim.
h. Rear seat cushion.
i. Tire house trim.
j. C-pillar trim.
k. Map light.
l. Sunvisor.
m. Assist handle.
n. Headliner.
6. Remove the clips A and B.
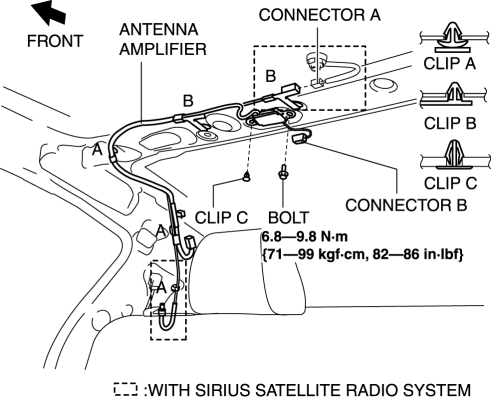
7. Disconnect the connector A. (with SIRIUS satellite radio system)
8. Disconnect the connector B..
9. Remove the clip C.
10. Remove the bolt.
11. Remove the antenna amplifier.
12. Install in the reverse order of removal.
Connector B Removal Note
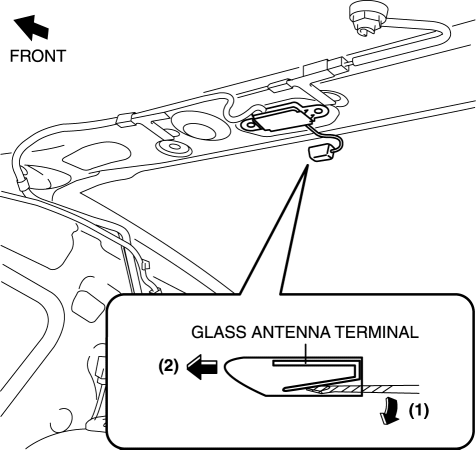
1. Remove the connector B in the direction of the arrow (2) shown in the figure while pressing the glass antenna terminal in the direction of the arrow (1).
With Audio Unit (With Display)
1. Disconnect the negative battery cable..
2. Remove the rain sensor cover. (Vehicles with auto light/wiper system).
3. Disconnect the rain sensor connector. (Vehicles with auto light/wiper system)
4. Partially peel back the seaming welts.
5. Remove the following parts:
a. Sunroof seaming welt (vehicles with sunroof)
b. A-pillar trim.
c. Front scuff plate.
d. Rear scuff plate.
e. B-pillar lower trim.
f. Upper anchor of the front seat belt.
g. B-pillar upper trim.
h. Rear seat cushion.
i. Tire house trim.
j. C-pillar trim.
k. Map light.
l. Sunvisor.
m. Assist handle.
n. Headliner.
6. Disconnect the connector A.
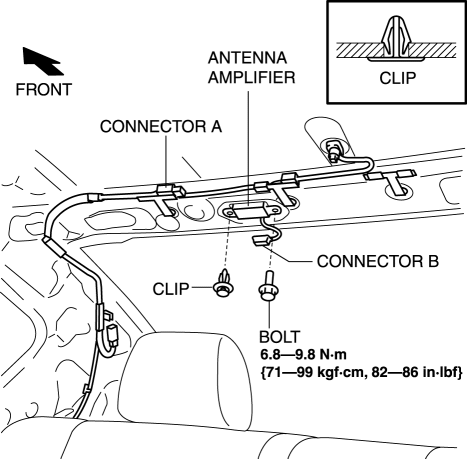
7. Disconnect the connector B..
8. Remove the clip.
9. Remove the bolt.
10. Remove the antenna amplifier.
11. Install in the reverse order of removal.
Connector B Removal Note
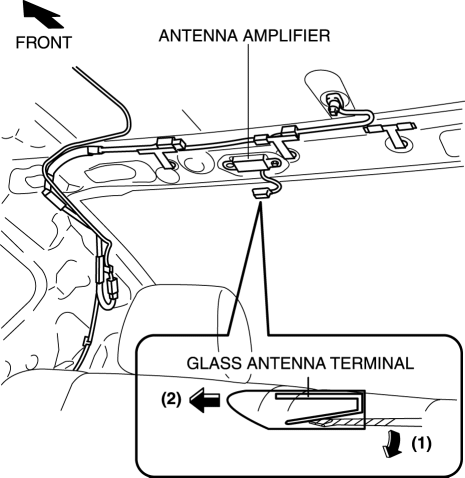
1. Remove the connector B in the direction of the arrow (2) shown in the figure while pressing the glass antenna terminal in the direction of the arrow (1).
 Antenna Amplifier Inspection
1. Disconnect the negative battery cable..
2. Remove the rain sensor cover. (Vehicles with auto light/wiper system).
3. Disconnect the rain sensor connector. (Vehicles with auto light/wiper system ...
 Antenna Feeder No.1 Inspection
1. Disconnect the negative battery cable..
2. Remove the following parts:
a. Center panel.
b. Audio unit.
c. A-pillar trim (RH).
3. Disconnect antenna feeder No.2.
4. Verify that the c ...
Other materials:
Clock
Setting the time
The clock can be set at any time when the
ignition is switched to ACC or ON.
To adjust the time, press the clock
button ( ) for about 2 seconds
until
a beep is heard.
The clock's current time will flash.
Time adjustment
To adjust the time, press the hour/
...
Schedule 2
U.S.A. (severe driving conditions) and Puerto Rico residents
Chart symbols:
I: Inspect: Inspect and clean, repair, adjust, fill up, or replace if
necessary.
R: Replace
L : Lubricate
T: Tighten
Remarks:
*1 Engine oil flexible maintenance is available for U.S.A. and Puerto Rico
resi ...
Rocking the Vehicle
WARNING
Do not spin the wheels at more than
56 km/h (35 mph), and do not allow
anyone to stand behind a wheel when
pushing the vehicle:
When the vehicle is stuck, spinning the
wheels at high speed is dangerous.
The spinning tire could overheat and
explode. This could c ...
