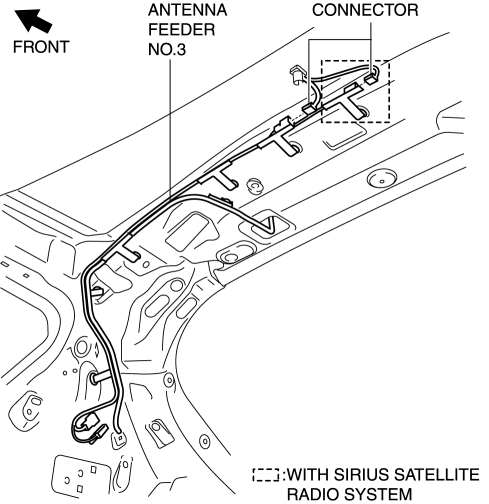
Mazda 3 Service Manual: Antenna Feeder No.3 Inspection
4SD (With Audio System (With Display))
1. Disconnect the negative battery cable..
2. Remove the rain sensor cover. (Vehicles with auto light/wiper system).
3. Disconnect the rain sensor connector. (Vehicles with auto light/wiper system)
4. Partially peel back the seaming welts.
5. Remove the following parts:
a. Sunroof seaming welt (vehicles with sunroof)
b. A-pillar trim.
c. Front scuff plate.
d. Rear scuff plate.
e. B-pillar lower trim.
f. Upper anchor of the front seat belt.
g. B-pillar upper trim.
h. Rear seat cushion.
i. Tire house trim.
j. C-pillar trim.
k. Map light.
l. Sunvisor.
m. Assist handle.
n. Headliner.
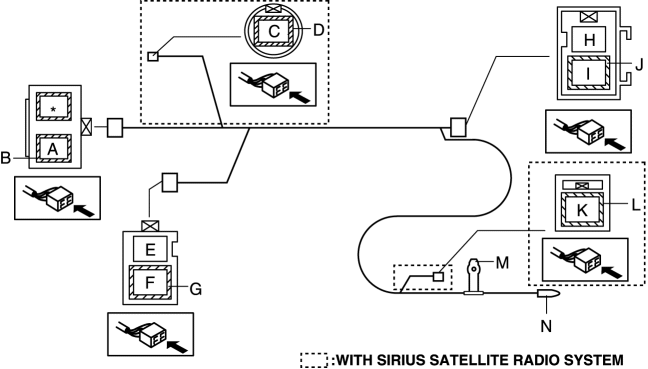
6. Disconnect the antenna feeder No.5 and connector..
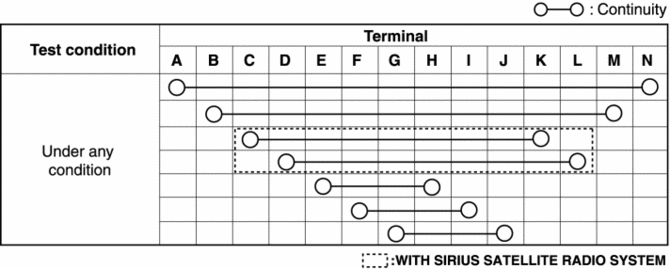
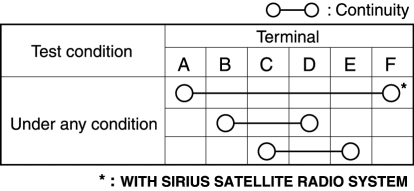
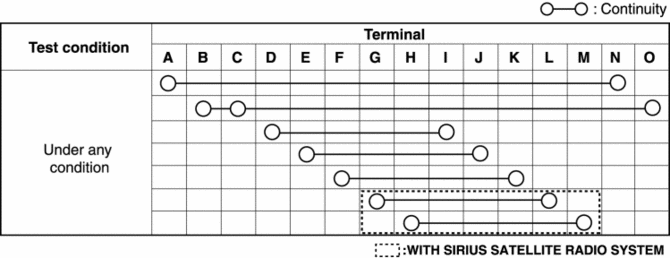
7. Verify that the continuity between antenna feeder No.3 terminals is as indicated in the table.
-
If not as indicated in the table, replace antenna feeder No.3.
5HB
With audio unit (without display)
1. Disconnect the negative battery cable..
2. Remove the rain sensor cover. (Vehicles with auto light/wiper system).
3. Disconnect the rain sensor connector. (Vehicles with auto light/wiper system)
4. Partially peel back the seaming welts.
5. Remove the following parts:
a. Sunroof seaming welt (vehicles with sunroof)
b. A-pillar trim.
c. Front scuff plate.
d. Rear scuff plate.
e. B-pillar lower trim.
f. Upper anchor of the front seat belt.
g. B-pillar upper trim.
h. Rear seat cushion.
i. Tire house trim.
j. Trunk side upper trim (5HB).
k. C-pillar trim.
l. Map light.
m. Sunvisor.
n. Assist handle.
o. Headliner.
6. Disconnect the connector.
7. Verify that the continuity between antenna feeder No.3 terminals is as indicated in the table.
-
If not as indicated in the table, replace antenna feeder No.3.
With audio unit (with display)
1. Disconnect the negative battery cable..
2. Remove the rain sensor cover. (Vehicles with auto light/wiper system).
3. Disconnect the rain sensor connector. (Vehicles with auto light/wiper system)
4. Partially peel back the seaming welts.
5. Remove the following parts:
a. Sunroof seaming welt (vehicles with sunroof)
b. A-pillar trim.
c. Front scuff plate.
d. Rear scuff plate.
e. B-pillar lower trim.
f. Upper anchor of the front seat belt.
g. B-pillar upper trim.
h. Rear seat cushion.
i. Tire house trim.
j. Trunk side upper trim (5HB).
k. C-pillar trim.
l. Map light.
m. Sunvisor.
n. Assist handle.
o. Headliner.
p. Liftgate upper trim.
6. Disconnect the antenna feeder No.5 and connector..
7. Disconnect the antenna feeder No.7..
8. Verify that the continuity between antenna feeder No.3 terminals is as indicated in the table.
-
If not as indicated in the table, replace antenna feeder No.3.
 Antenna Feeder No.2 Removal/Installation
1. Disconnect the negative battery cable..
2. Remove the rain sensor cover. (Vehicles with auto light/wiper system).
3. Disconnect the rain sensor connector. (Vehicles with auto light/wiper system ...
 Antenna Feeder No.3 Removal/Installation
4SD (With Audio Unit (With Display))
1. Disconnect the negative battery cable..
2. Remove the rain sensor cover. (Vehicles with auto light/wiper system).
3. Disconnect the rain sensor connector. ...
Other materials:
Tires
For reasons of proper performance, safety,
and better fuel economy, always maintain
recommended tire inflation pressures and
stay within the recommended load limits
and weight distribution.
WARNING
Using Diff erent Tire Types:
Driving your vehicle with diff erent
types of tires ...
Electric Variable Valve Timing Actuator, Hydraulic Variable Valve Timing Actuator
Removal/Installation [Skyactiv G 2.0]
WARNING:
A hot engine can cause severe burns. Turn off the engine and wait until it
is cool before servicing.
CAUTION:
Do not disassemble the electric variable valve timing actuator and hydraulic
variable valve timing actuator because they are precision units.
If ...
Malfunctioning Wheel Unit Identification
NOTE:
The tire pressure monitoring system (TPMS) does not identify the location
of the malfunctioning wheel unit on the vehicle (RF, LF, LR, RR). The TPMS identifies
each wheel unit as No.1, No.2, No.3 and No.4. In order to identify the location
of the wheel unit, perform the follow ...
