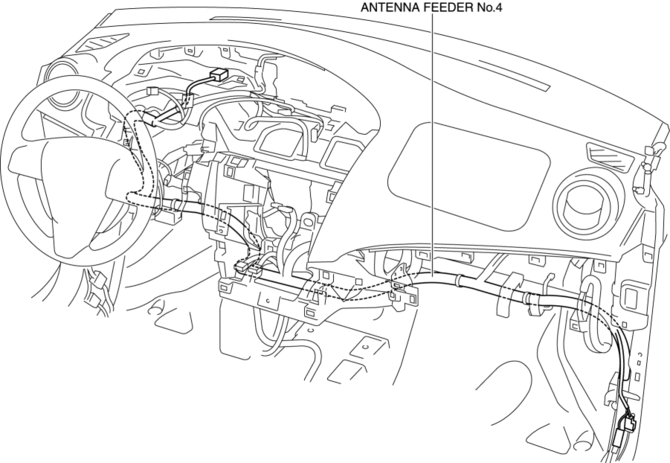
Mazda 3 Service Manual: Antenna Feeder No.4 Removal/Installation
Removal
NOTE:
-
The antenna feeder No.4 is integrated with the dashboard wiring harness.
1. Refer to DASHBOARD DISASSEMBLY/ASSEMBLY.
Installation
CAUTION:
-
If the antenna feeder No.4 is installed with tension on the cable and wiring harness it could result in loosening of the connection areas and poor contact. When installing and connecting the antenna feeder No.4, always make sure there is slack on the cable and wiring harness
NOTE:
-
The antenna feeder No.4 is integrated with the dashboard wiring harness.
-
When installing a new antenna feeder No.4, secure it to the vehicle wiring harness along the installation route of the old antenna feeder No.4.
 Antenna Feeder No.4 Inspection
1. Disconnect the negative battery cable..
2. Remove the following parts:
a. Upper column cover.
b. Instrument cluster.
c. Center panel.
d. Audio unit (Vehicles with audio unit).
e. Center ...
 Antenna Feeder No.5 Inspection
1. Disconnect the negative battery cable..
2. Remove the following parts:
a. Front scuff plate (RH).
b. Front side trim (RH).
c. Rear seat cushion.
d. Rear scuff plate (RH).
e. Tire house ...
Other materials:
Opening the Hood
With the vehicle parked, pull the
release handle to unlock the hood.
Insert your hand into the hood opening,
slide the latch lever to the right, and lift
up the hood.
NOTE
The lever is located a little to the left of
center when facing the vehicle.
Grasp the support r ...
Child Restraint Seat Anchor Removal/Installation
4SD
1. Remove the cover.
2. Remove the bolt and child-restraint seat anchor.
3. Install in the reverse order of removal.
5HB
1. Remove the trunk end trim..
2. Remove the bolt and child-restraint seat anchor.
3. Install in the reverse order of removal. ...
Battery Removal/Installation [Mzr 2.3 Disi Turbo]
1. Remove in the order indicated in the table.
2. Install in the reverse order of removal.
1
Battery cover
(See Battery Cover Removal Note.)
(See Battery Cover Installation Note.)
2
Negative battery cable
3
...
