Mazda 3 Service Manual: Back Up Light Switch Inspection
1. Disconnect the negative battery cable..
2. Remove the battery component. (ex: battery, battery tray and PCM component) (G35-MR,G66M-R).
3. Remove the aerodynamic under cover No.2. (G35-MR,G66M-R,C66M-R).
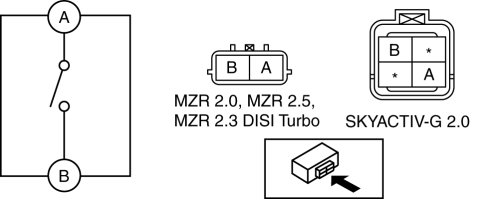
4. Disconnect the back-up light switch connector..
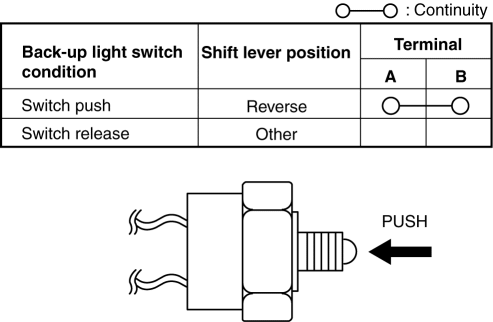
5. Verify that the continuity between the back-up light switch terminals is as indicated in the table.
-
If not as indicated in the table, replace the back-up light switch.
 Rear Combination Light Removal/Installation
4SD
1. Disconnect the negative battery cable..
2. Remove the following parts:
a. Trunk mat.
b. Trunk board.
c. Trunk end trim.
d. Trunk side trim.
3. Disconnect the connectors shown in th ...
 Back Up Light Switch Removal/Installation [A26 M R]
1. Disconnect the negative battery cable.
2. Disconnect the back-up light switch connector.
3. Remove the aerodynamic under cover No.2..
4. Remove the back-up light switch with the gasket.
...
Other materials:
Driving assist systems
In the Subaru Solterra, a range of advanced driving assist systems
work seamlessly in the background to enhance safety, stability, and overall driving
performance. These systems automatically respond to changing road and driving conditions;
however, they are designed to support the driver and ...
Up Switch Inspection [Fw6 A EL]
Continuity Inspection
NOTE:
The up switch is built into the selector lever component.
1. Remove the battery cover..
2. Disconnect the negative battery cable..
3. Remove the console..
4. Disconnect the selector lever component connector.
5. Verify that the continuity betwee ...
Rear Wiper Motor Removal/Installation
1. Disconnect the negative battery cable..
2. Remove the following parts:
a. Rear wiper arm and blade.
b. Liftgate upper trim.
c. Liftgate side trim.
d. Liftgate lower trim.
3. Disconnect the rear wiper motor connector.
4. Remove the bolts, then remove the rear wiper motor.
5. Re ...
