Mazda 3 Service Manual: Blind Spot Monitoring (Bsm) Off Switch Removal/Installation
1. Disconnect the negative battery cable..
2. Remove the switch panel in the direction of the arrow shown in the figure.
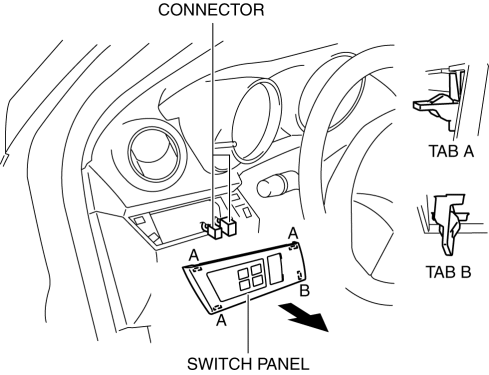
3. Disconnect the connector.
4. Remove the BSM OFF switch in the direction of the arrow (2) shown in the figure while pressing the tabs in the direction of the arrow (1).
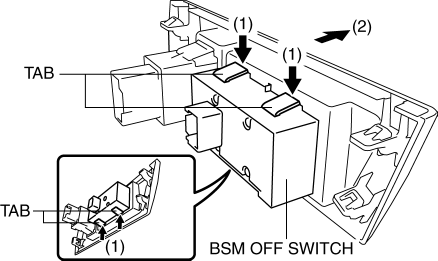
5. Remove the BSM OFF switch.
6. Install in the reverse order of removal.
 Blind Spot Monitoring (Bsm) Off Switch Inspection
1. Disconnect the negative battery cable..
2. Remove the BSM OFF switch..
3. Verify that the continuity between the BSM OFF switch terminals is as indicated
in the table.
If the cont ...
 No.6 Bsm Indicator Light Flashes While Not Under Bsm Indicator Light Flashing
Conditions (No Combination Switch Operation (Turn Signal Switch)) [Blind Spot Monitoring
(Bsm)]
No.6 Bsm Indicator Light Flashes While Not Under Bsm Indicator Light Flashing
Conditions (No Combination Switch Operation (Turn Signal Switch)) [Blind Spot Monitoring
(Bsm)]
6
BSM indicator light flashes while not under BSM indicator light-flashing
conditions (no combination switch operation (turn signal switch)
Description
...
Other materials:
Interior Light Removal/Installation
1. Disconnect the negative battery cable..
2. Remove the rain sensor cover. (Vehicles with auto light/wiper system).
3. Remove the following parts:
a. Sunroof seaming welt (vehicles with sunroof)
b. A-pillar trim.
c. Front scuff plate.
d. Rear scuff plate.
e. B-pillar lower trim.
f. ...
Operating the Radio
Radio ON
Press a band selector button ( )
to
turn the radio on.
Band selection
Successively pressing the band selector
button ( ) switches the bands as
follows: FM1→FM2→AM.
The selected mode will be indicated.
NOTE
If the FM broadcast signal becomes weak,
reception auto ...
Seat Belt Inspection
Belt
1. Verify that the belt is installed properly with no twists or kinks.
2. Verify that there is no damage to the seat belt and no deformation of the
metal fittings.
If there is any malfunction, replace the seat belt.
ELR
Except 5HB (rear center seat belt)
1. Verify tha ...
