Mazda 3 Service Manual: Brake Fluid Air Bleeding
CAUTION:
-
Brake fluid will damage painted surfaces. Be careful not to spill any on painted surfaces. If it is spilled, wipe it off immediately.
NOTE:
-
Keep the fluid level in the reserve tank at 3/4 full or more during the air bleeding.
-
Begin air bleeding with the brake caliper that is furthest from the master cylinder.
-
Brake fluid type
-
SAE J1703 or FMVSS116 DOT-3
1. Remove the cap from the brake fluid reserved tank and add brake fluid.
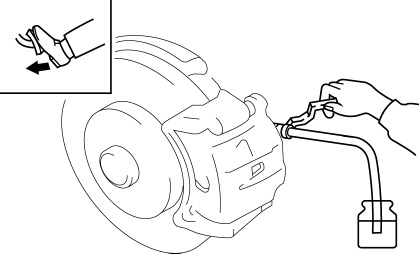
2. Remove the bleeder cap on the brake caliper, and attach a vinyl tube to the bleeder screw.
3. Place the other end of the vinyl tube in a clear container and fill the container with fluid during air bleeding.
4. Working with two people, one should pump the brake pedal several times and depress and hold the pedal down.
5. While the brake pedal is depressed, the other should loosen the bleeder screw using a commercially available flare nut wrench, drain out any fluid containing air bubbles, and tighten the bleeder screw.

-
Tightening torque
-
Front (MZR 2.0, SKYACTIV-G 2.0, MZR 2.5): 7.0—9.0 N·m {72—91 kgf·cm, 62—79 in·lbf}
-
Front (MZR 2.3 DISI Turbo): 12—16 N·m {123—163 kgf·cm, 107—141 in·lbf}
-
Rear: 12—16 N·m {123—163 kgf·cm, 107—141 in·lbf}
6. Repeat Steps 4 and 5 until no air bubbles are seen.
7. Perform air bleeding as described in the above procedures for all brake calipers.
8. After air bleeding, inspect the following:
-
Brake operation
-
Fluid leakage
-
Fluid level
 General
...
 Brake Fluid Inspection
1. Verify that the brake fluid level in the reserve tank is between the MAX and
MIN marks.
If the brake fluid level is below the MIN mark, add brake fluid.
...
Other materials:
Operating Tips for Audio System
WARNING
Always adjust the audio while the
vehicle is stopped:
Do not adjust the audio control
switches while driving the vehicle.
Adjusting the audio while driving
the vehicle is dangerous as it could
distract your attention from the vehicle
operation which could lead ...
On Board Diagnostic System PID/Data Monitor Inspection [Fw6 A EL]
1. Connect the M-MDS (IDS) to the DLC-2.
2. After the vehicle is identified, select the following items from the initialization
screen of the IDS.
a. Select “DataLogger”.
b. Select “Modules”.
c. Select “TCM”.
3. Select the applicable PID from the PID table.
4. Verify the PID data a ...
Engine Coolant
Inspecting Coolant Level
WARNING
Do not use a match or live fl ame in the
engine compartment. DO NOT ADD
COOLANT WHEN THE ENGINE IS HOT:
A hot engine is dangerous. If the
engine has been running, parts of the
engine compartment can become very
hot. You could be burned. C ...
