
Mazda 3 Service Manual: Clock Spring Inspection [Standard Deployment Control System]
1. Disconnect the negative battery cable..
2. Remove the driver–side air bag module..
3. Remove the steering wheel..
4. Remove the column cover.
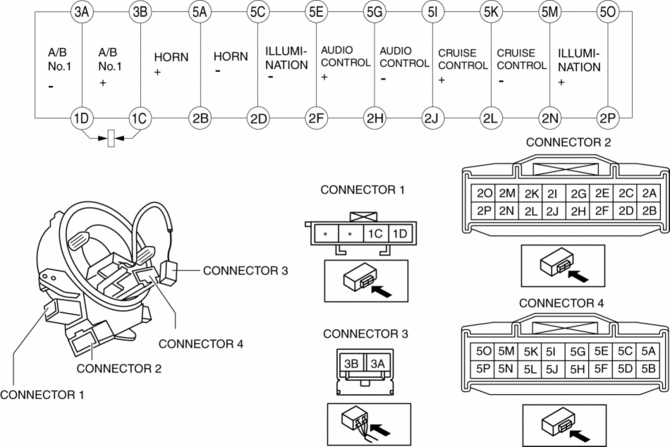
5. Remove the clock spring..
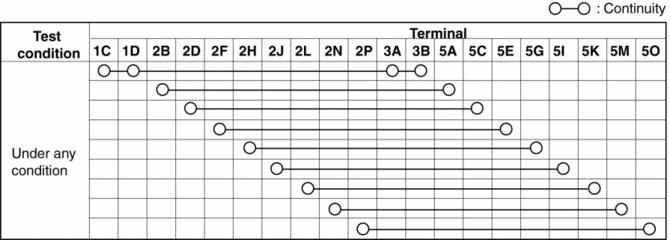
6. Verify that the continuity is as indicated in the table.
-
If not as indicated in the table, replace the clock spring.
NOTE:
-
When the vehicle-side connector for the clock spring is disconnected, terminals 1C and 1D are shorted to prevent unexpected operation (deployment) of the air bag module.
Vehicles with steering switch
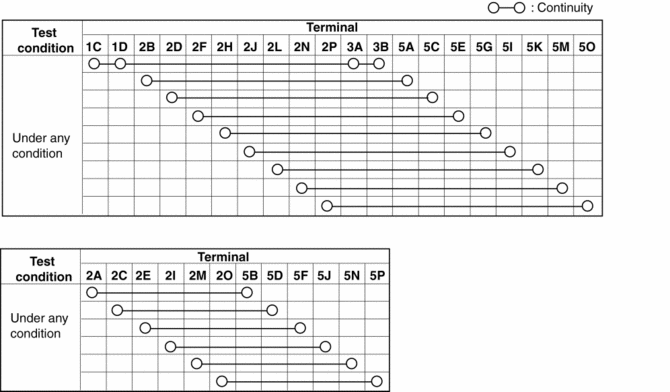
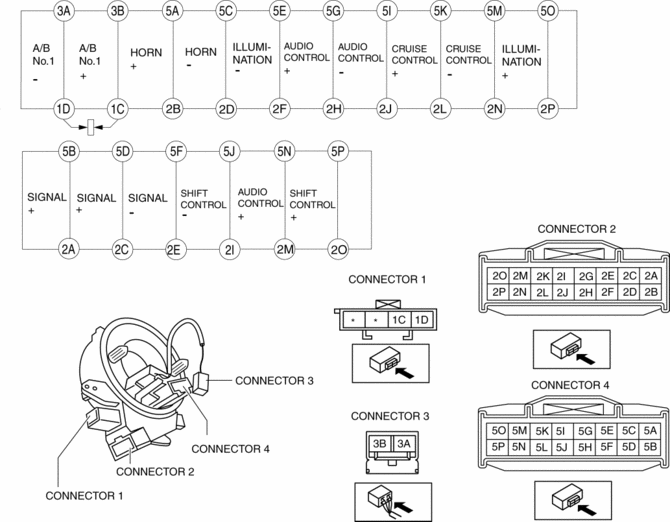
Vehicles without steering switch
 Barometric Pressure (Baro) Sensor Inspection [Mzr 2.0, Mzr 2.5]
Voltage Inspection
NOTE:
Because the BARO sensor is integrated in the PCM, replacing the BARO sensor
includes replacement of the PCM.
1. Connect the M-MDS to the DLC–2.
2. Sw ...
 Clock Spring Inspection [Two Step Deployment Control System]
1. Disconnect the negative battery cable..
2. Remove the driver–side air bag module..
3. Remove the steering wheel..
4. Remove the column cover.
5. Remove the clock spring..
6. Verify that ...
Other materials:
Entertainment System
Outline
Auxiliary jack/USB port has been adopted.
USB adapter has been adopted.
An audio unit which supports USB devices such as USB memory or iPods has
been adopted.
911 assist function has been added to the Bluetooth unit.
RDS-TMC (Radio Data System-Traffi ...
Child restraint system fixed with a seat belt
In the Subaru Solterra, a child restraint system for infants or small children
must be properly secured using the lap portion of the lap/shoulder seat belt. Correct
installation is essential to ensure that the system provides effective protection
in all driving conditions.
■ Installing chil ...
Spark Plug Removal/Installation [Mzr 2.3 Disi Turbo]
CAUTION:
If a spark plug that is not as specified is installed, engine performance
will be deteriorated. Install only the specified spark plug when replacing.
1. Remove the battery cover..
2. Disconnect the negative battery cable..
3. Remove the charge air cooler..
4. Remove t ...
