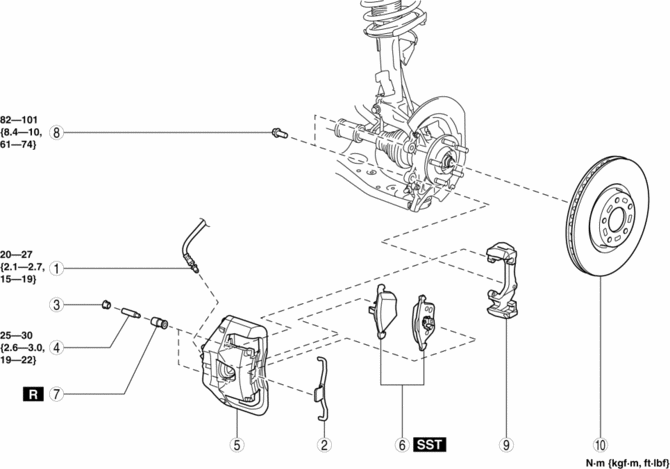
Mazda 3 Service Manual: Front Brake (Disc) Removal/Installation [Mzr 2.3 Disi Turbo]
1. Remove in the order indicated in the table.
2. Install in the reverse order of removal.
3. After installation, pump the brake pedal a few times and verify that the brakes do not drag.
|
1 |
Brake hose (See Brake Hose Installation Note.) |
|
2 |
Retaining clip (See Retaining Clip Removal Note.) |
|
3 |
Cap |
|
4 |
Bolt |
|
5 |
Caliper |
|
6 |
Disc pad (See Disc Pad Installation Note.) |
|
7 |
Boot |
|
8 |
Bolt |
|
9 |
Mounting support |
|
10 |
Disc plate |
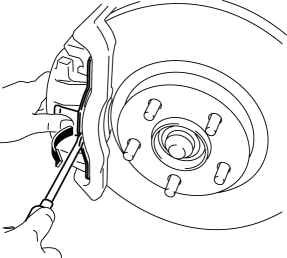
Retaining Clip Removal Note
1. Move the retaining clip in the direction shown by the arrow using a flathead screwdriver and remove it from the caliper.
Disc Pad Installation Note
1. Clean the exposed area of the piston.
2. Push the piston in using the SST
.
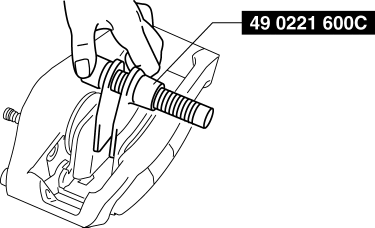
3. Install the disc pad to the caliper.
Brake Hose Installation Note
1. Install the brake hose to the caliper.
2. Tighten the flare nut while holding the brake hose at point A with a spanner or equivalent.
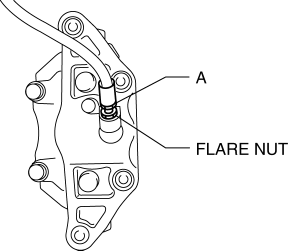
3. Verify that the brake hose is not twisted.
 Front Brake (Disc) Removal/Installation [Mzr 2.0, Skyactiv G 2.0, Mzr 2.5]
1. Remove in the order indicated in the table.
2. Install in the reverse order of removal.
3. After installation, pump the brake pedal a few times and verify that the brakes
do not drag.
...
 Rear Brake (Disc) Inspection
Brake Judder Repair Hints
Description
1. Brake judder concern has the following 3 characteristics:
Steering wheel vibration
1. The steering wheel vibrates in the rotation direction. This characte ...
Other materials:
How to Use the Bluetooth ® Audio
System
Switching to Bluetooth ® audio mode
To listen to music or voice audio recorded
to a Bluetooth ® audio device, switch to
the Bluetooth ® audio mode to operate
the audio device using the audio system
control panel. Any Bluetooth ® audio
device must be paired to the vehicle's
Bluetooth ® unit be ...
Using LATCH Lower Anchor
Your Mazda is equipped with LATCH lower anchors for attachment of specially
designed
LATCH child-restraint systems in the rear seats. Both anchors must be used,
otherwise the
seat will bounce around and put the child in danger. Most LATCH child-restraint
systems
must also be used in conjunc ...
Front Combination Light Removal/Installation
WARNING:
Incorrect servicing of the discharge headlights could result in electrical
shock. Before servicing the discharge headlights, always refer to the discharge
headlight service warnings..
1. Disconnect the negative battery cable..
2. Remove the front bumper..
3. Disconne ...
