Mazda 3 Service Manual: Front Door Key Cylinder Switch Inspection
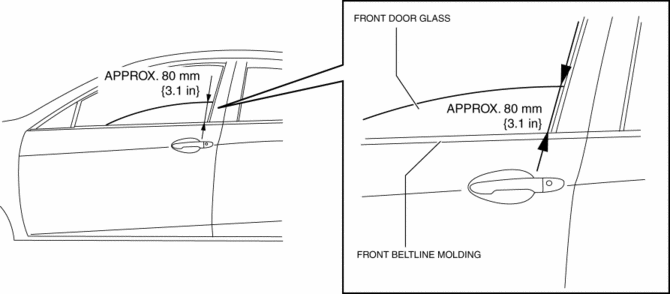
1. To access the glass installation bolt, position the front door glass so that the distance from the top of the front door glass to the upper part of the front beltline molding is approx. 80 mm {3.1 in}
.
2. Disconnect the negative battery cable..
3. Remove the following parts:
a. Inner garnish.
b. Front door trim.
c. Front door speaker.
d. Front door glass.
e. Front door module panel.
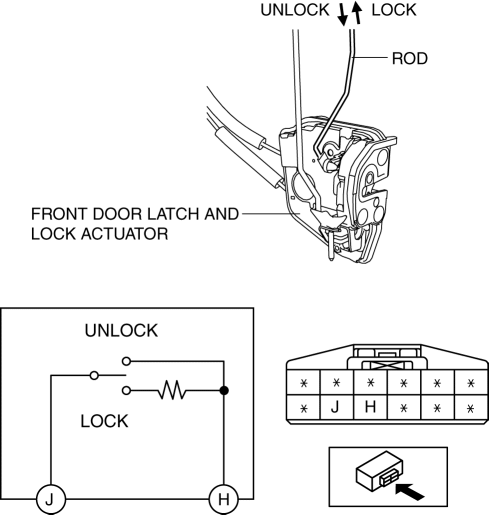
f. Front door latch and lock actuator.
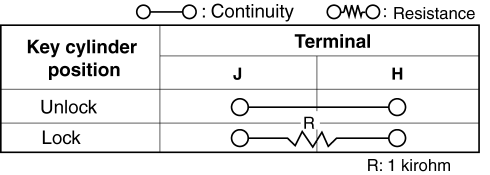
4. Move the rod of the door key cylinder switch in the direction of the arrow shown in the figure, and verify that the continuity is as indicated in the table.
-
If not as indicated in the table, replace the front door latch and lock actuator.
 Front Door Key Cylinder Removal/Installation
1. To access the glass installation bolt, position the front door glass so that
the distance from the top of the front door glass to the upper part of the front
beltline molding is approx. 80 mm { ...
 Trunk Lid Key Cylinder Removal/Installation
1. Disconnect the negative battery cable..
2. Remove the trunk lid trim..
3. Lift the clip in the direction of the arrow (1), and pull out the key rod
in the direction of the arrow (2).
4. ...
Other materials:
SUBARU Safety Sense
The SUBARU Safety Sense suite in the Subaru Solterra integrates a
range of advanced driver assistance technologies designed to support the driver
and enhance both safety and comfort during everyday driving. These intelligent systems
work together to help reduce collision risk, improve awarenes ...
Antenna Feeder No.2 Inspection
1. Disconnect the negative battery cable..
2. Remove the following parts:
a. A-pillar trim (RH).
b. Rear seat cushion (4SD).
c. Rear scuff plate (RH).
d. Tire house trim (RH).
e. Trunk side upper trim (5HB, RH).
f. Trunk side trim (5HB, RH).
g. C–pillar trim (RH).
3. Disconnect t ...
Steering Shaft Inspection
1. Inspect the column bearing for excessive play and damage.
2. Verify that the measurement of the steering shaft indicated in the figure
is as specified.
If not within the specification replace the steering shaft component.
Steering shaft length
315—320 mm {12.41—1 ...
