Mazda 3 Service Manual: Front Door Key Cylinder Switch Inspection
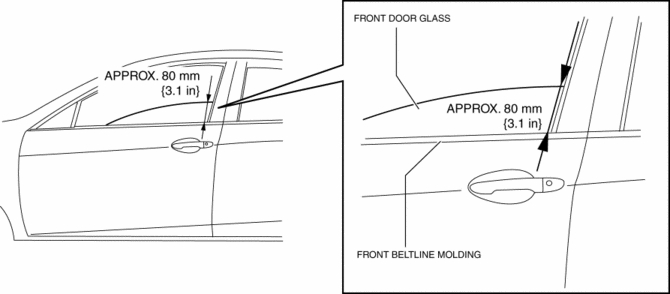
1. To access the glass installation bolt, position the front door glass so that the distance from the top of the front door glass to the upper part of the front beltline molding is approx. 80 mm {3.1 in}
.
2. Disconnect the negative battery cable..
3. Remove the following parts:
a. Inner garnish.
b. Front door trim.
c. Front door speaker.
d. Front door glass.
e. Front door module panel.
f. Front door latch and lock actuator.
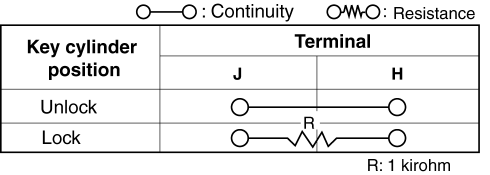
4. Move the rod of the door key cylinder switch in the direction of the arrow shown in the figure, and verify that the continuity is as indicated in the table.

-
If not as indicated in the table, replace the front door latch and lock actuator.
 Front Door Key Cylinder Removal/Installation
1. To access the glass installation bolt, position the front door glass so that
the distance from the top of the front door glass to the upper part of the front
beltline molding is approx. 80 mm { ...
 Front Door Latch And Lock Actuator Inspection
1. The following actuators and switches are integrated with the front door latch
and lock actuator. Inspect the front door latch and lock actuator according to each
inspection procedure for the fo ...
Other materials:
Information on Passenger Vehicle Tires
Please refer to the sample below.
TIN: U.S. DOT tire identification number
Passenger car tire
Nominal width of tire in millimeters
Ratio of height to width (aspect ratio)
Radial
Run-flat tire
Rim diameter code
Load index & speed symbol
Severe snow conditions
Tire ply co ...
Input/Turbine Speed Sensor Inspection [FS5 A EL]
CAUTION:
Water or foreign objects entering the connector can cause a poor connection
or corrosion. Be sure not to drop water or foreign objects on the connector
when disconnecting it.
On-Vehicle Inspection
1. Perform the following procedures.
a. Remove the battery cover..
b. ...
Windshield Wiper And Washer Switch Inspection
1. Disconnect the negative battery cable..
2. Remove the following parts:
a. Front scuff plate (Driver‘s side).
b. Front side trim (Driver‘s side).
c. Hood release lever.
d. Upper panel.
e. Shift knob (MTX).
f. Selector lever knob (ATX).
g. Shift panel.
h. Side wall.
i. Conso ...
