Mazda 3 Service Manual: Front Door Trim Disassembly/Assembly
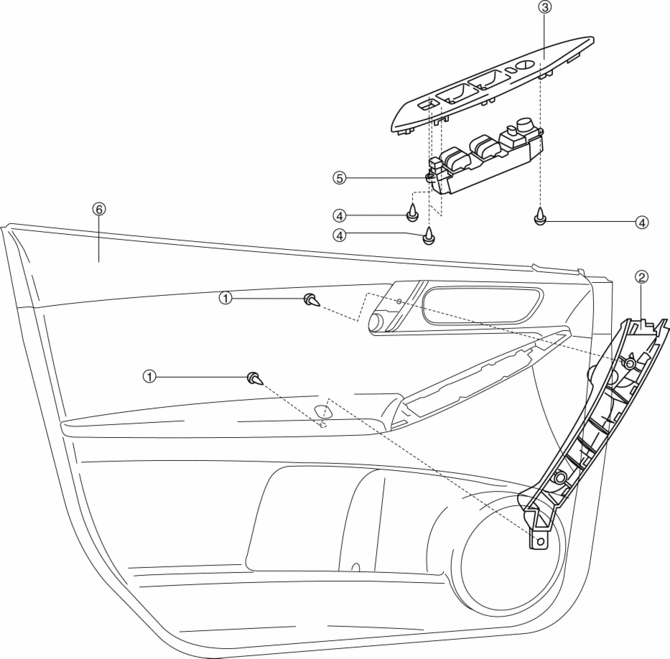
Driver-side
1. Disassemble in the order shown in the figure.
|
1 |
Screw A |
|
2 |
Assist handle |
|
3 |
Switch panel cover |
|
4 |
Screw B |
|
5 |
Power window main switch |
|
6 |
Front door trim |
2. Assemble in the reverse order of disassembly.
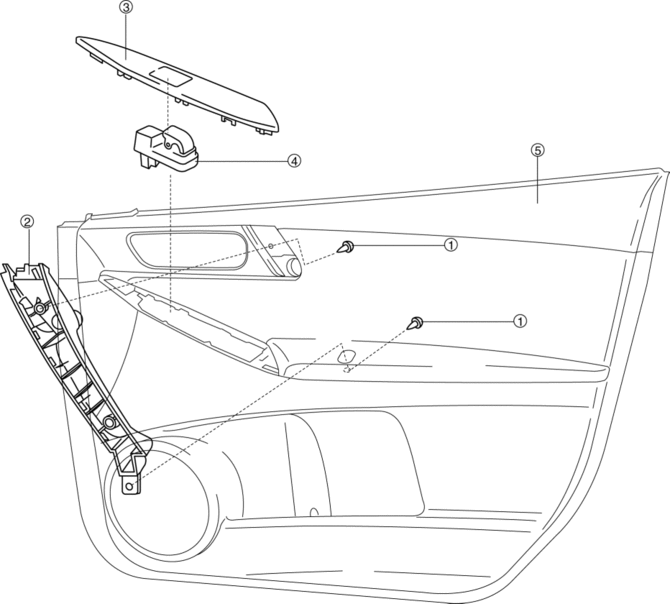
Passenger-side
1. Disassemble in the order shown in the figure.
|
1 |
Screw |
|
2 |
Assist handle |
|
3 |
Switch panel cover |
|
4 |
Power window subswitch |
|
5 |
Front door trim |
2. Assemble in the reverse order of disassembly.
 Trunk Lid Opener Switch Removal/Installation
1. Disconnect the negative battery cable..
2. Remove the trunk lid trim..
3. Remove the high-mount brake light..
4. Remove the screw.
5. Install in the reverse order of removal. ...
 Front Door Trim Removal/Installation
1. Disconnect the negative battery cable..
2. Remove the inner garnish..
3. Move the hook in the direction of arrow shown in the figure using a tape-lapped
flathead screwdriver and detach it fro ...
Other materials:
Antenna Amplifier Removal/Installation
With Audio Unit (Without Display)
1. Disconnect the negative battery cable..
2. Remove the rain sensor cover. (Vehicles with auto light/wiper system).
3. Disconnect the rain sensor connector. (Vehicles with auto light/wiper system)
4. Partially peel back the seaming welts.
5. Remove the fo ...
Rear Stabilizer Control Link Inspection
1. Remove the rear stabilizer control link from the vehicle..
2. Inspect for bending or damage. If there is any malfunction, replace the rear
stabilizer control link.
3. Rotate the ball joint stud 10 times and shake it side to side 10
times.
4. Measure the ball joint rotational torque usin ...
Keyless Control Module Removal/Installation
1. If the keyless control module is replaced, always perform the following procedure.
Vehicles with immobilizer system
Keyless Control Module Configuration.
Immobilizer System-related Parts Programming [No.4 Programming Procedure
Due to Keyless Control Module Rep ...
