Mazda 3 Service Manual: Front Power Window Regulator Removal/Installation
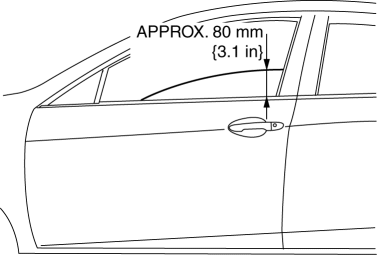
1. To access the glass installation bolt, position the front door glass so that the distance from the top of the front door glass to the upper part of the front beltline molding is approx. 80 mm {3.1 in}.
2. Disconnect the negative battery cable..
3. Remove the following parts:
a. Inner garnish.
b. Front door trim.
c. Front door speaker.
d. Front door glass.
e. Front power window motor.
4. Remove the nuts.
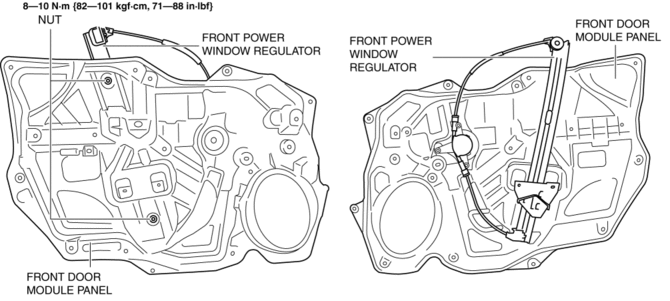
5. Install in the reverse order of removal.
CAUTION:
-
When installing, do not allow the cable to come out from the drum housing.
 Front Door Glass Removal/Installation
1. To access the glass installation bolt, position the front door glass so that
the distance from the top of the front door glass to the upper part of the front
beltline molding is approx. 80 mm { ...
 Glass Antenna
Purpose, Function
4SD
The AM/FM radio waves and RDS-TMC (Radio Data System-Traffic Message Channel)
radio waves are converted to an electrical signal and the signal is sent to
the audio ...
Other materials:
Bluetooth ® Preparation (Type B)
Device pairing
To use Bluetooth ® audio and Hands-Free,
the device equipped with Bluetooth ® has
to be paired to the unit using the following
procedure. A maximum of seven devices
including Bluetooth ® audio devices and
hands-free mobile phones can be paired.
NOTE
The Bluetooth ® system ...
Rear Turn Light Bulb Removal/Installation
4SD
1. Disconnect the negative battery cable..
2. Remove the following parts:
a. Trunk mat.
b. Trunk board.
c. Trunk end trim.
3. Partially peel back the trunk side trim..
4. Remove in the order indicated in the table.
1
Connector
2
...
Check Valve Inspection [Skyactiv G 2.0]
Airflow Inspection
1. Remove the vacuum hose..
2. Blow air into the vacuum hose using your mouth from the vacuum pump side and
verify that the air flows to the intake manifold side, then blow air from the intake
manifold side and verify that the air does not flow to the vacuum pump side.
...
