Mazda 3 Service Manual: Front Side Trim Removal/Installation
1. Remove the front scuff plate..
2. Partially peel back the seaming welt.
3. Remove the fastener.
4. Pull the front side trim in the direction of the arrow and detach the clip.
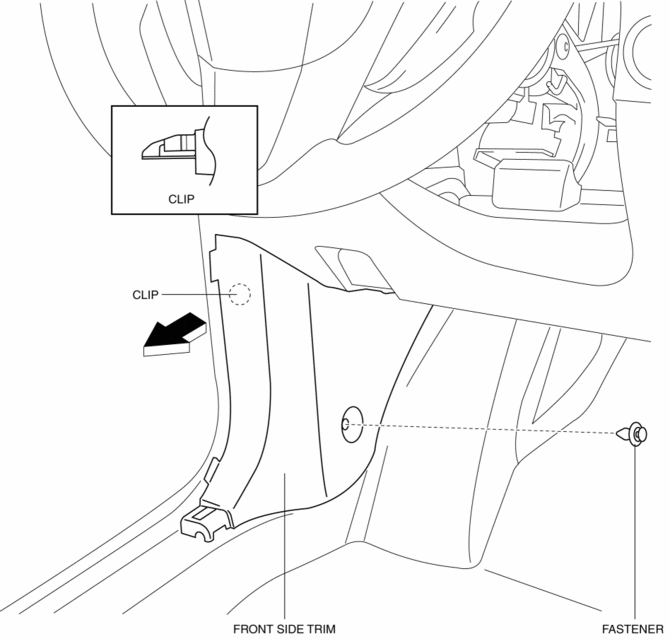
5. Install in the reverse order of removal.
 Front Scuff Plate Removal/Installation
1. Detach tab A while pulling the front scuff plate in the direction of the arrow
(1) shown in the figure, then detach hook B, clips C, and pins D while pulling in
the direction of the arrow (2). ...
 Headliner Removal/Installation
1. Shift to the D (ATX) or 4th gear (MTX) position. (4SD)
2. Disconnect the negative battery cable..
3. Remove the rain sensor cover. (Vehicles with auto light/wiper system).
4. Disconnect the r ...
Other materials:
Maintenance requirements
For the Subaru Solterra, consistent daily care and properly scheduled
maintenance are ą║ą╗čÄč湊ą▓ąĖą╝ąĖ čäą░ą║č鹊čĆą░ą╝ąĖ ą┤ą╗čÅ ąĘą░ą▒ąĄąĘą┐ąĄč湥ąĮąĮčÅ
ą▒ąĄąĘą┐ąĄčćąĮąŠčŚ, ąĄč乥ą║čéąĖą▓ąĮąŠčŚ čéą░ ąĄą║ąŠąĮąŠą╝č¢čćąĮąŠčŚ ąĄą║čüą┐ą╗čāą░čéą░čåč¢čŚ.
ąÆą╗ą░čüąĮąĖą║ ą░ą▓č鹊ą╝ąŠą▒č¢ą╗čÅ ąĮąĄčüą ...
High Mount Brake Light Disassembly/Assembly
4SD
1. Disconnect the negative battery cable..
2. Remove the trunk lid trim..
3. Remove the high-mount brake light..
4. Remove the high-mount brake light outer lens.
5. Remove the high-mount brake light inner lens.
6. Remove the screws (with advanced keyless entry and push button ...
Glossary of Terms
Tire Placard: A label indicating the OE tire sizes, recommended inflation
pressure, and the
maximum weight the vehicle can carry.
Tire Identification Number (TIN): A number on the sidewall of each tire
providing
information about the tire brand and manufacturing plant, tire size, and date o ...
