Mazda 3 Service Manual: Front Stabilizer Removal/Installation [Mzr 2.0, Skyactiv G 2.0, Mzr 2.5]
1. Remove the joint cover..
2. Disconnect the steering shaft from the steering gear and linkage..
3. Remove the front crossmember component..
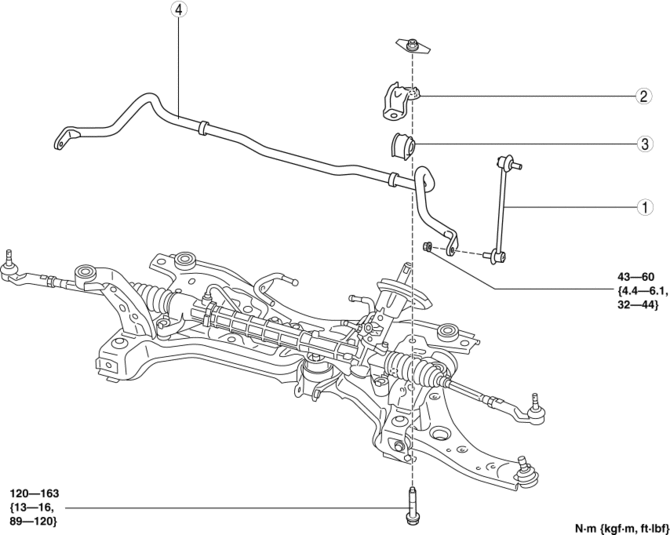
4. Remove in the order indicated in the table.
5. Install in the reverse order of removal.
6. Inspect the wheel alignment and adjust it if necessary..
|
1 |
Front stabilizer control link |
|
2 |
Front stabilizer bracket (SeeFront Stabilizer Bracket Removal Note.) (See Front Stabilizer, Front Stabilizer Bushing and Front Stabilizer Bracket Installation Note.) |
|
3 |
Front stabilizer bushing (SeeFront Stabilizer, Front Stabilizer Bushing and Front Stabilizer Bracket Installation Note.) |
|
4 |
Front stabilizer (See Front Stabilizer, Front Stabilizer Bushing and Front Stabilizer Bracket Installation Note.) |
Front Stabilizer Bracket Removal Note
1. Secure the front stabilizer bracket flange using a vise.
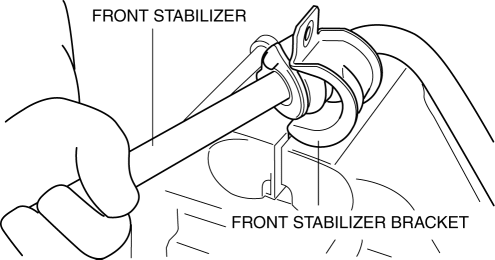
2. Remove the front stabilizer.
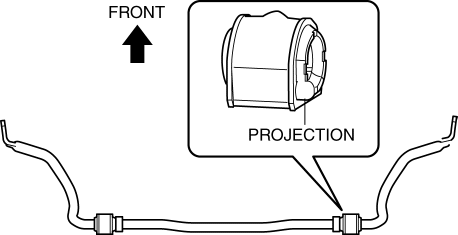
Front Stabilizer, Front Stabilizer Bushing and Front Stabilizer Bracket Installation Note
1. Install the front stabilizer bushing so that the projection points to the right side of the vehicle.
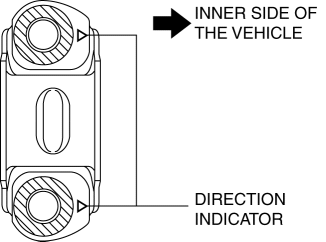
2. Point the direction indicator on the stabilizer bracket inward and install front stabilizer bracket using a vise.
3. Temporarily install the front stabilizer component.
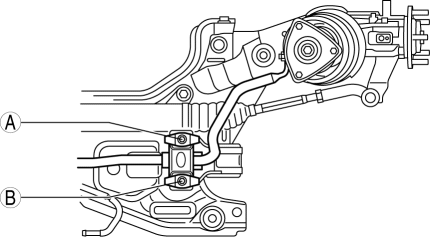
4. Tighten the bolts following order.
a. Temporarily tighten bolts A and B shown in the figure.
b. Tighten bolt A.
c. Tighten bolt B.
d. Tighten bolt A.
 Front Stabilizer Control Link Inspection
1. Remove the front stabilizer control link from the vehicle.. (See FRONT STABILIZER
REMOVAL/INSTALLATION [MZR 2.3 DISI Turbo]
2. Inspect for bending or damage. If there is any malfunction, replac ...
 Front Stabilizer Removal/Installation [Mzr 2.3 Disi Turbo]
1. Remove the joint cover..
2. Disconnect the steering shaft from the steering gear and linkage..
3. Remove the front crossmember component..
4. Remove in the order indicated in the table.
5. ...
Other materials:
Solenoid Valve Removal/Installation [FS5 A EL]
WARNING:
A hot transaxle and ATF can cause severe burns. Turn off the engine and wait
until they are cool.
Primary Control Valve Body
1. Remove the primary control valve body.
a. Remove the battery cover..
b. Disconnect the negative battery cable.
c. Remove the aerodynamic un ...
Supplier Identification Procedure [Audio]
Identification Using the Label or Inscribed Lettering
1. Disconnect the negative battery cable..
2. Remove the center panel..
3. Remove the audio unit..
4. Verify the supplier by referring to the label attached to each unit.
Verify Using the Diagnostic Assist Function
Without display
...
How to use iPod mode (Type A)
An iPod may not be compatible depending
on the model or OS version. In this case,
an error message is displayed.
NOTE
The iPod functions on the iPod cannot
be operated while it is connected to the
unit because the unit controls the iPod
functions.
Playback
Switch the ignition to ACC ...
