Mazda 3 Service Manual: Front Stabilizer Removal/Installation [Mzr 2.3 Disi Turbo]
1. Remove the joint cover..
2. Disconnect the steering shaft from the steering gear and linkage..
3. Remove the front crossmember component..
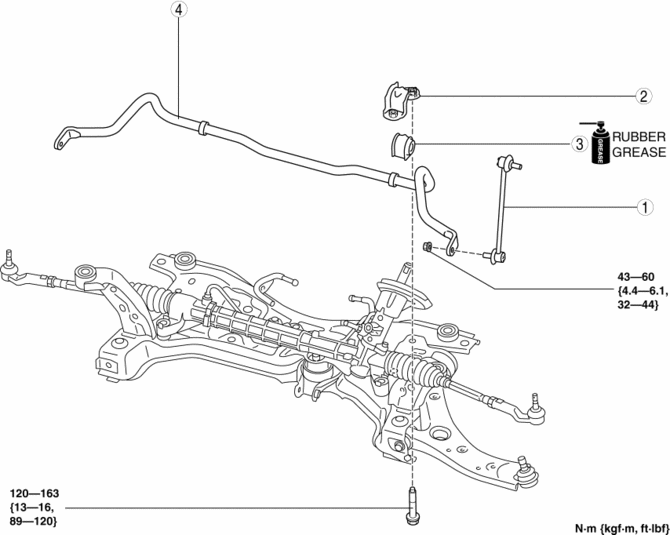
4. Remove in the order indicated in the table.
5. Install in the reverse order of removal.
6. Inspect the wheel alignment and adjust it if necessary..
|
1 |
Front stabilizer control link |
|
2 |
Front stabilizer bracket (See Front Stabilizer, Front Stabilizer Bushing and Front Stabilizer Bracket Installation Note.) |
|
3 |
Front stabilizer bushing (See Front Stabilizer, Front Stabilizer Bushing and Front Stabilizer Bracket Installation Note.) |
|
4 |
Front stabilizer (See Front Stabilizer, Front Stabilizer Bushing and Front Stabilizer Bracket Installation Note.) |
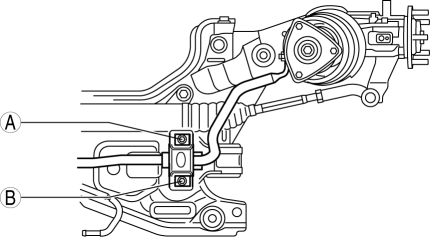
Front Stabilizer, Front Stabilizer Bushing and Front Stabilizer Bracket Installation Note
CAUTION:
-
Verify that the front stabilizer bushings are not caught between the front stabilizer bracket and the front crossmember, and install the front stabilizer bracket using the following procedure.
1. Temporarily tighten bolts A and B shown in the figure.
2. Tighten bolt A.
3. Tighten bolt B.
4. Tighten bolt A.
 Front Stabilizer Removal/Installation [Mzr 2.0, Skyactiv G 2.0, Mzr 2.5]
1. Remove the joint cover..
2. Disconnect the steering shaft from the steering gear and linkage..
3. Remove the front crossmember component..
4. Remove in the order indicated in the table.
5. ...
 Front Wheel Hub Bolt Replacement
1. Remove the brake calliper component and disc plate..
2. Remove the wheel hub bolt using the SST as shown in the figure.
NOTE:
When removing the wheel hub bolts, perform the work bet ...
Other materials:
Vehicle Speed Sensor (VSS) Removal/Installation [FS5 A EL]
CAUTION:
If foreign materials are stuck to the sensor, disturbance by magnetic flux
can cause sensor output to be abnormal and thereby negatively affect control.
Make sure that foreign materials such as iron filings are not stuck to the sensor
during installation.
1. Perform t ...
Oil Control Valve (OCV) Removal/Installation [Mzr 2.0, Mzr 2.5]
1. Remove the battery cover..
2. Disconnect the negative battery cable..
3. Remove the plug hole plate..
4. Disconnect the wiring harness.
5. Remove the ignition coils..
6. Remove the ventilation hose.
7. Remove the oil level gauge.
8. Remove the cylinder head cover..
9. Remove in th ...
Rear Seat Belt Removal/Installation
CAUTION:
The ELR (emergency locking retractor) has a spring that will unwind if the
retractor cover is removed. The spring cannot be rewound by hand. If this occurs,
the ELR will not work properly. Therefore, do not disassemble the retractor.
4SD
1. Remove the following part ...
