Mazda 3 Service Manual: Supplier Identification Procedure [Audio]
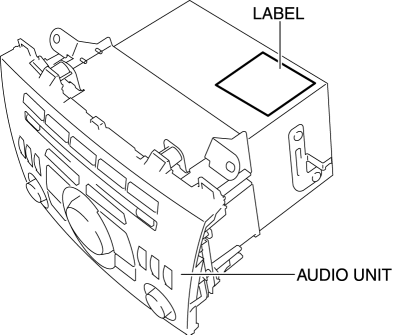
Identification Using the Label or Inscribed Lettering
1. Disconnect the negative battery cable..
2. Remove the center panel..
3. Remove the audio unit..
4. Verify the supplier by referring to the label attached to each unit.
Verify Using the Diagnostic Assist Function
Without display
1. Switch the ignition to ACC or ON.
2. Turn the audio unit power to ON.
3. While pressing the POWER/VOLUME switch, simultaneously press the PRESET switch 5 for 3 s or more
.
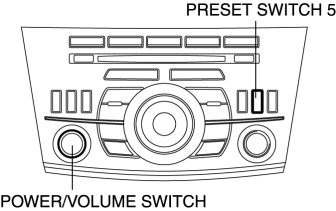
4. Identify the supplier code by referring to the information display.

|
Supplier code |
Supplier name |
|
01 |
SANYO Automedia |
|
02 |
Panasonic |
|
03 |
Clarion |
|
04 |
Pioneer |
|
05 |
VISTEON |
NOTE:
-
The supplier code can also be identified from the DTC displays screen.

5. Cancel the diagnostic assist function by either turning off the audio unit power or by switch the ignition to off.
With display
1. Switch the ignition to ACC or ON.
2. Verify that the audio is turned on. If the audio is turned off, press the POWER/VOLUME switch to turn it on.
3. Press the POWER/VOLUME switch and SEEK switch (up) simultaneously to launch the diagnostic assist function.
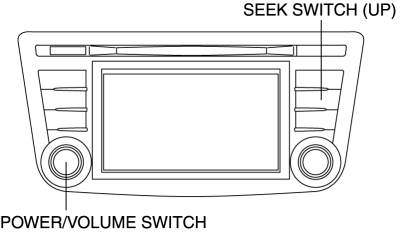
4. Verify that the launched diagnostic assist function is displayed on the screen.
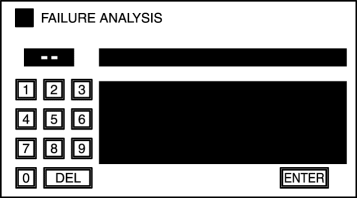
5. Input diagnostic assist code "06".
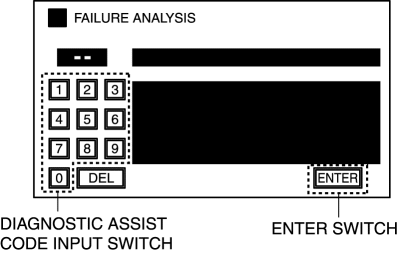
6. Select "ENTER switch".
7. Identify the supplier code by referring to the display.
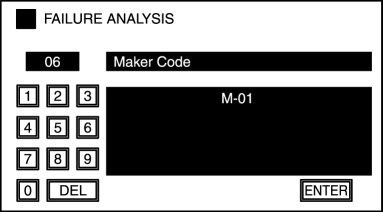
|
Supplier code |
Supplier name |
|
M-01 |
SANYO Automedia |
|
M-02 |
Panasonic |
|
M-03 |
Clarion |
|
M-04 |
Pioneer |
|
M-05 |
VISTEON |
8. Press the POWER/VOLUME switch and return to the diagnostic assist screen.
9. Press the POWER/VOLUME switch and end the diagnostic assist function.
 Sirius Satellite Radio Unit Removal/Installation
1. Disconnect the negative battery cable..
2. Remove the following parts:
a. Passenger-side front scuff plate.
b. Passenger-side front side trim.
c. Dashboard under cover.
d. Grove compartme ...
 Tweeter Inspection
1. Disconnect the negative battery cable..
2. Remove the inner garnish..
3. Remove the tweeter..
4. Verify the resistance between tweeter terminals.
If not within the specification, ...
Other materials:
Antenna (5-Door)
AM/FM Radio Antenna *
The AM/FM radio antenna receives both
AM and FM signals.
(Type A)
To remove the antenna, turn it
counterclockwise.
To install the antenna, turn it clockwise.
Make sure the antenna is securely
installed.
CAUTION
To prevent damage to the antenna,
r ...
Floor Mat
WARNING
Make sure the fl oor mats are hooked on
the retention pins to prevent them from
bunching up under the foot pedals:
Using a fl oor mat that is not secured is
dangerous as it will interfere with the
accelerator and brake pedal operation,
which could result in an acc ...
Engine SST [Mzr 2.3 Disi Turbo]
1: Mazda SST number
2: Global SST number
Example
1:49 UN30 3328
2:303–328
Rear oil seal replacer
1:–
2:303–507
Crankshaft TDC timing pin
1:49 UN30 310610
2:303–1061
Camshaft
alignment timi ...
