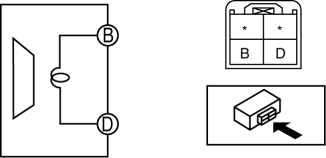
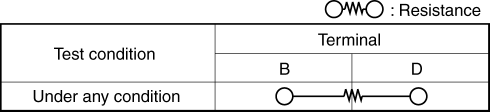
Mazda 3 Service Manual: Rear Center Speaker Inspection
1. Disconnect the negative battery cable..
2. Remove the following parts:
a. Rear seat cushion.
b. Rear scuff plate.
c. Tire house trim.
d. C-pillar trim.
e. Rear package trim.
f. Rear center speaker.
3. Verify the resistance between the rear center speaker terminals.
-
If not within the specification, replace the rear center speaker.
-
Resistance
-
0.9—1.1 ohms
 Keyless Antenna Removal/Installation
Interior, Front
1. Disconnect the negative battery cable..
2. Remove the following parts:
a. Upper panel.
b. Shift knob (MTX).
c. Selector lever knob (ATX).
d. Shift panel.
e. Side wall. ...
 Rear Center Speaker Removal/Installation
1. Disconnect the negative battery cable..
2. Remove the following parts:
a. Rear seat cushion.
b. Rear scuff plate.
c. Tire house trim.
d. C-pillar trim.
e. Rear package trim.
3. Remove ...
Other materials:
Back Up Light Switch Inspection
1. Disconnect the negative battery cable..
2. Remove the battery component. (ex: battery, battery tray and PCM component)
(G35-MR,G66M-R).
3. Remove the aerodynamic under cover No.2. (G35-MR,G66M-R,C66M-R).
4. Disconnect the back-up light switch connector..
5. Verify that the continuity be ...
Drive Belt Auto Tensioner Inspection [Mzr 2.3 Disi Turbo]
1. Remove the aerodynamic under cover No.2 and splash shield as a single unit..
2. Remove the drive belt..
3. Verify that the drive belt auto tensioner moves smoothly in the operational
direction.
Replace the drive belt auto tensioner if necessary..
4. Rotate the drive belt ...
Front Door Latch And Lock Actuator Inspection
1. The following actuators and switches are integrated with the front door latch
and lock actuator. Inspect the front door latch and lock actuator according to each
inspection procedure for the following items.
Front door lock actuator.
Door lock-link switch.
Door latch s ...
