Mazda 3 Service Manual: Side Turn Light Inspection
Side turn light illumination inspection
1. Disconnect the negative battery cable..
2. Remove the outer mirror glass..
3. Remove the outer mirror garnish..
4. Remove the side turn light..
5. Connect the battery voltage as shown in the figure.
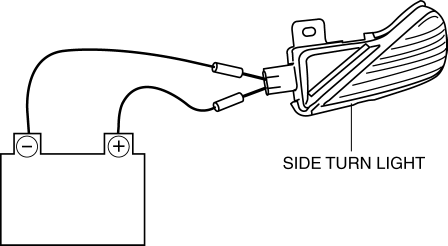
-
If the side turn light does illuminate, replace it.
-
If the side turn light illuminate, inspect the short-code.
Short-code inspection
1. Remove the inner garnish..
2. Remove the front door trim..
3. Disconnect the power outer mirror connector..
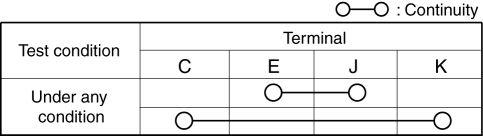
4. Verify that the continuity between side turn light terminals is as indicated in the table.
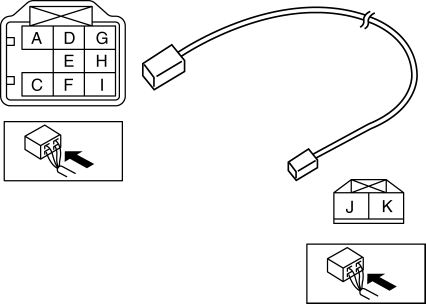
5. If not as indicated in the table, replace the power outer mirror.
 Rear Turn Light Bulb Removal/Installation
4SD
1. Disconnect the negative battery cable..
2. Remove the following parts:
a. Trunk mat.
b. Trunk board.
c. Trunk end trim.
3. Partially peel back the trunk side trim..
4. Remove in th ...
 Side Turn Light Removal/Installation
1. Disconnect the negative battery cable..
2. Remove the outer mirror glass..
3. Remove the outer mirror garnish..
4. Remove the screw.
5. Disconnect the connector.
6. Remove the side tu ...
Other materials:
Trunk Lid Removal/Installation
WARNING:
Removing the trunk lid stay damper without supporting the trunk lid can be
dangerous. The trunk lid may fall and injure you. Be sure to open the trunk
lid completely and support it securely before removing the trunk lid stay damper.
1. Disconnect the negative battery cab ...
Restraints SST [Two Step Deployment Control System]
49 H066 002
Deployment tool
49 D066 002
Adapter harness
49 L066 002
Adapter harness
49 G066 003
Adapter harness
49 N088 0A0
Fuel and Therm ...
Schedule 2
Chart symbols:
I: Inspect: Inspect and clean, repair, adjust, fill up, or replace if
necessary.
R: Replace
L : Lubricate
C: Clean
T: Tighten
Remarks:
*1 Use of FL-22 is recommended when replacing engine coolant. Using engine
coolant other than FL-22 may
cause serious damage to the en ...
