Mazda 3 Service Manual: Oil Cooler Removal/Installation [FS5 A EL]
1. Remove the battery cover..
2. Disconnect the negative battery cable.
3. Remove the air cleaner component..
4. Remove the aerodynamic under cover NO.2..
5. Drain the ATF..
6. Drain the engine coolant..
7. Remove in the order indicated in the table.
|
1 |
Water hose (connected to the outlet) |
|
2 |
Water hose (connected to the thermostat) |
|
3 |
Oil hose (See Oil Hose Installation Note.) |
|
4 |
Hose clamp (See Oil Hose Installation Note.) |
|
5 |
Connector bolt |
|
6 |
Packing |
|
7 |
Oil cooler |
8. Install in the reverse order of removal.
9. Add the engine coolant..
10. Add the ATF..
11. Perform the “Mechanical System Test”..
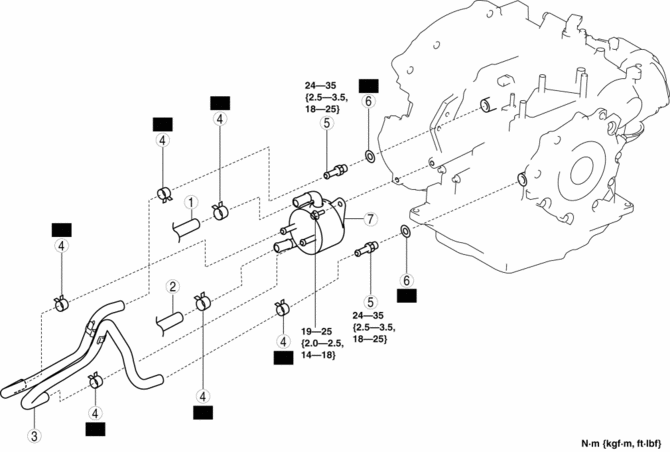
Oil Hose Installation Note
1. Install the oil hose.
-
Oil cooler side
-
Install the oil hose into the oil cooler to the position shown in the figure.
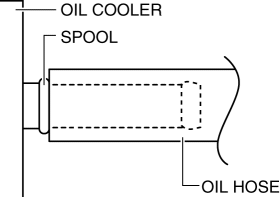
-
Connector bolt side
-
Install the oil hose into the connector bolt to the position shown in the figure.
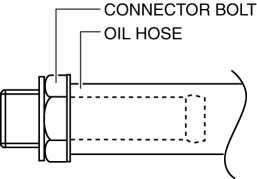
2. Install the hose clamp within the marked area of the oil hose.
NOTE:
-
If the oil hose is to be re-used, install the hose clamp to the impression in the hose left by the previous installation. After installation, apply force to the hose clamp in the direction of the arrows to engage the hose clamp securely.
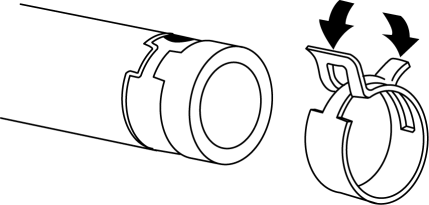
3. Verify that the hose clamp does not interfere with any other components.
 Oil Cooler Flushing [FS5 A EL]
NOTE:
If the automatic transaxle is replaced, flush and inspect the oil cooler.
When replacing the automatic transaxle, inspect the oil cooler together with
flushing it using the fo ...
 Oil Cooler Removal/Installation [Fw6 A EL]
1. Remove the battery cover..
2. Disconnect the negative battery cable..
3. Remove the aerodynamic under cover NO.2..
4. Drain the ATF..
5. Drain the engine coolant..
6. Remove in the order ...
Other materials:
Lower Panel Removal/Installation
Driver-side
1. Disconnect the negative battery cable..
2. Remove the following parts:
a. Driver-side front scuff plate.
b. Driver-side front side trim.
c. Hood release lever.
d. Upper panel.
e. Shift knob (MTX).
f. Selector lever knob (ATX).
g. Shift panel.
h. Side wall.
i. Cons ...
Front Door Removal/Installation
WARNING:
Removing the front door without supporting it could cause the front door
to fall and cause serious injury. Always perform the procedure with at least
another person to prevent the front door from falling.
1. Disconnect the negative battery cable..
2. Remove in the orde ...
Rear Center Speaker Inspection
1. Disconnect the negative battery cable..
2. Remove the following parts:
a. Rear seat cushion.
b. Rear scuff plate.
c. Tire house trim.
d. C-pillar trim.
e. Rear package trim.
f. Rear center speaker.
3. Verify the resistance between the rear center speaker terminals.
If ...
