Mazda 3 Service Manual: Wheel Hub Component Removal/Installation
CAUTION:
-
Performing the following procedures without first removing the ABS wheel-speed sensor may possibly cause an open circuit in the wiring harness if it is pulled by mistake. Before performing the following procedures, disconnect the ABS wheel-speed sensor connector (axle side) and fix the wiring harness to an appropriate place where it will not be pulled by mistake while servicing the vehicle.
1. Remove in the order indicated in the table.
2. Install in the reverse order of removal.
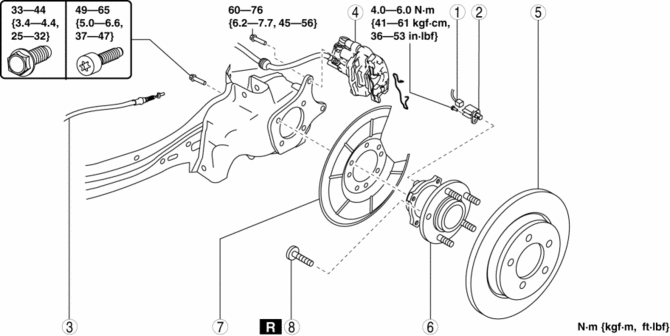
|
1 |
ABS wheel-speed sensor connector |
|
2 |
ABS wheel-speed sensor |
|
3 |
Rear parking brake cable (See PARKING BRAKE LEVER REMOVAL/INSTALLATION.) |
|
4 |
Brake caliper component (See Brake Caliper Component Removal Note.) (See REAR BRAKE (DISC) REMOVAL/INSTALLATION.) |
|
5 |
Disc plate |
|
6 |
Wheel hub component |
|
7 |
Dust cover |
|
8 |
Wheel hub bolt (See Wheel Hub Bolt Removal Note.) (See Wheel Hub Bolt Installation Note.) |
Brake Caliper Component Removal Note
1. Remove the retaining clip and mounting support installing bolt.
2. Remove the brake caliper component from the trailing link and suspend it out of the way using a cable.
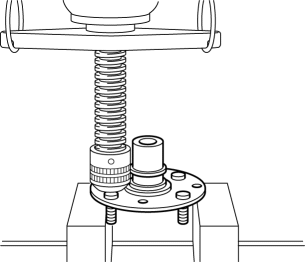
Wheel Hub Bolt Removal Note
NOTE:
-
The hub bolts do not need to be removed unless they are being replaced.
1. Remove the hub bolt using a press.
Wheel Hub Bolt Installation Note
1. Install the new hub bolt using a press.
 Wheel Hub Component Inspection
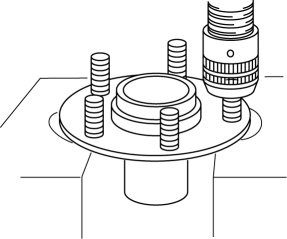
Wheel Bearing Excessive Play Inspection
1. Remove the brake caliper component and disc plate..
2. Install the magnetic base and dial gauge as shown in the figure and measure
the wheel bearing axi ...
 Front Suspension
...
Other materials:
Recliner Motor Inspection
1. Remove the battery cover..
2. Disconnect the negative battery cable and wait 1 min or more..
3. Disconnect the recliner motor connector.
4. Apply battery positive voltage to the recliner motor terminals and inspect
the recliner motor operation.
If not as specified, replace the ...
Climate Control Unit Inspection [Full Auto Air Conditioner]
1. Remove the climate control unit with the connector connected..
2. Switch the ignition to ON.
3. Connect the negative (-) lead of the tester to body ground.
4. By inserting the positive (+) lead of the tester into each climate control
unit terminal, measure the voltage according to the ter ...
Liftgate Adjustment
1. Measure the gap and height difference between the liftgate and the body.
2. Loosen the liftgate hinge installation bolts and adjust the gap by moving
the liftgate.
Standard clearance
a: 5.0―7.0 mm {0.20―0.27 in}
b: -2.0―0 mm {-0.078―0 in}
...
